I am a big fan of circle skirts. And they're so easy to make! I was a bit hesitant before I tried to make one a few months back, but I found
this tutorial and it made it look so
easy.
And it really
is easy. Once you've made one, you can make a dozen a day, seriously. I have all kinds of circle skirts, but I didn't have a regular black one... so, off to the fabric store I went!
I rummaged through the scrap fabric bins again (fabric bought by the yard is so damn expensive here). I found these pieces of black and gray fabric and snatched a few 25cm zippers as well. The topmost fabric was a bit expensive, but I liked it so I had to buy it as well. It's this thick glossy black. I'm going to make a more formal skirt out of that one... but first, I decided to make a flowy gray circle skirt.
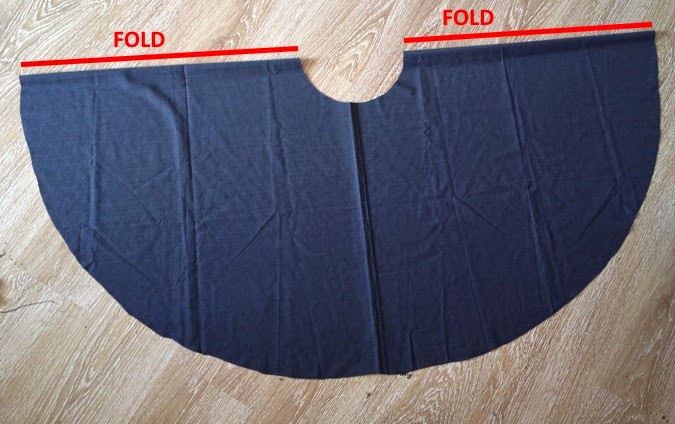
I have made a pattern of a circle skirt that is 70cm long (a bit below my knee because I am a friggin' giant). This is half the skirt, so you can either cut two pieces or then just fold one piece of fabric where the picture shows. This time I wanted one that falls above my knee, so I only used the pattern for the waistline...
To calculate the radius of the half circle that forms the waistline, measure your waist at the part where you want the skirt to sit. For me this was 70cm. To calculate the radius, divide your waist measurement with 2π. So for me it would be
70/2π
=70/6.28
=11,14. My old pattern has a rounded up waist radius of 12cm, I just used that because I wanted to bunch up the waistline a bit.
If you don't have a pattern, you can just measure the radius from the center of the fold, as I've done with the pins here. Then just cut right outside the pins (dotted line).
Here I wanted to find out how long a skirt this piece of fabric would allow, so I put the end of the measuring tape on the waistline...
...and measured it down to the end of the fabric. 62cm.
So then I measured 62cm in every direction from the waistline, pinning as I went along. This forms the hem of the skirt.
I cut the waistline...
...and then cut the hem along the pinned line I'd just measured. This is what the skirt looks when cut.
Next, I made the waistband. It should measure a good 5cm more than the waistline of your skirt. The width can be whatever you like. I wanted a narrower waistband, so mine was something around 12cm, so the end result would be around 5 centimeters with the seam allowance.
I pinned the waistband lengthwise (right side against right side if your fabric has a pattern or something) and sewed it. I then pulled the long, narrow tube of fabric inside out, so that the nice seam is on the outside.
I pinned the waistband onto my skirt, right side against right side (it looks like you're pinning it upside down but that's the right way to go). I bunched up the skirt fabric in a few places, but that's optional. I then sewed along the pinned line...
...and got this. On the left you can see where the waistband ends. At that part I cut a slit for the zipper.
I pinned the zipper, deciding to go for a contrast color.
I then sewed the zipper on so the zip was open until I got to the very end. Then I zipped up the zipper and sewed down the rest of the way.
Look, it has a zipper! A
red zipper, for that matter.
Next up, pinning the hem. Hemming a circle skirt is a bitch, because the hem is, well, a
circle shape, so it will not fold nicely. Also, there will be meters and meters of hemline to fold and pin. I made a narrow hem seam, folding the fabric over twice for a nice hem.
I then sewed the hem, choosing a red thread to go with the zipper.
So the skirt was now more or less done. But the skirt looked rather dull on its own, so I wanted to make pockets. I usually add pockets to the side seams of a skirt, but with this circle skirt there are none. So I rummaged through my stash, in search of something red.
I took out a linen shirt I have stashed in my refashion pile and cut off one of the sleeves at the dotted line. I then ripped open the side seam and cut the fabric in two, forming two rectangles with the sleeve's original hem as the top of the pocket. I folded the sides and the bottom of the pocket squares and ironed them (I love how well linen behaves when ironed... it makes such nice, sharp folds). I then pinned the pockets over the sides of the skirt. I decided they looked better slightly angled. I sewed them on...
...and the skirt then looked like this. Not dull any more, no sir.
Here's the back with the red zipper.
Closeup of the hem. I had to iron the hem to get it to settle nicely.
This is what the skirt looks like on me. The length is perfect and I love it how flowy the fabric is.
Pockets!
And the cost of this skirt?
Around 4 euros, zipper and thread included.
Nice.
Next, I'll probably make a simple black circle skirt for the winter. :)
love,
soundrel


This is so so cute! I love what you did with the pockets there :) So happy that I post things like this on the internet, because then people like you go and make them even better, and inspire me, and then it's just a great big upward spiral of inspiration haha.
ReplyDeleteThanks! The pockets were just something I tried on a whim, but they turned out to be so nice on the skirt :) Perhaps I'll do more of visible pockets from this on... Inspiration is a wonderful thing, and I'm glad you've shared yours in your blog :)
Delete