Tuesday, August 16, 2016

Fall/Winter coat from secondhand materials


Hey everyone,
Fall is fast approaching, as the crazy rain and wind have proven several times within the last few weeks. So, I thought about making a coat for cold weather - something perhaps not quite as thick and wintery as the one I made in January, but something for the fall anyway.

I'd had the fabric I used for this project for quite some time... About a year ago, I found 5 meters of this fabric with yellow and orange print in a local secondhand store for 5 euros. "1 euro per meter," I thought, "that's cheap as dirt. I'm sure I'll use this fabric for something at some point."


The fabric is thick and has a nice texture to it - it's probably meant for curtains or upholstery? It had a brand name (Harlequin) on it, and it also said "printed in the UK" on the selvage. I couldn't find this particular print anywhere on their website, so apparently it's an older design.

***


I also had purchased this secondhand (70s? 80s? 90s?) dress pattern at some point for 25 cents. I didn't like the dress as-is, because it was just so... well, awful? :D


So why buy a pattern I don't like? Simple: I buy cheap, uncut patterns in secondhand stores and use them as pattern paper when I need some. I just draw my own pattern onto the paper, and sometimes I can use parts of the original pattern, like the armhole curve and sleeve and whatnot. But most of the time I just ignore the original pattern and use the paper as if it were blank.

However, when I unfolded the pattern, the pattern pieces looked very, very similar than the pieces I myself had drawn from scratch for my first coat in January! I actually dug out that pattern and compared the pieces, and what do you know, aside from minor details they were almost identical, even in size! Whaaaaaaat. Perhaps this pattern wasn't so awful after all? :D

So I decided to use the pattern pieces, well, with slight modifications.


I'd gotten inspired by all kinds of pocket designs I'd seen on Pinterest, and that's why I cut the front pieces like that. I had no idea if the pattern I made was going to work the way I imagined, or how it would be assembled if it worked, but I decided to try anyway. After all, all I could lose was 5 euros and some of my time. I modified the center front pieces to include lapels, which the original dress pattern didn't have, and I also made the hem wider. The back pieces I used almost as-is, I simply cut them wider at the hem as well. The sleeves were used as-is aside from length (I added ~15cm of length because my arms are super long, just like my legs. Essentially, I'm just a pile of super long limbs with a torso hiding somewhere in the middle.)

The fabric print was one-way (it helpfully said "TOP --->" in the selvage, pointing which way was up), so I had to place the pattern pieces on the fabric in a rather wasteful way. This didn't matter much, though, because there was 5 meters of fabric to use.


I cut the pieces out one by one (not on fold), because the front piece was too wide to cut when the fabric was folded. This left me with a lot of scraps (I used some for pocket bags, facings and such) and a good meter for the hood pieces. Perfect!

Pocket top pieces (x4), pocket bags and neckline facings.


I interfaced all the small pieces, like pockets and facings, and also shoulder seams, armholes, lapels etc with iron-on interfacing. After interfacing (the most boring task while making a coat in my opinion) was done, I could sew my pocket idea together. So how it worked was that I sewed two of those pocket top pieces right sides together at the top of the v-shape. I turned this the right side out, ironed and top-stitched. Then I sewed this piece and the pocket bag onto the front piece of the coat, right sides together. The coat was right side up, on top of that was the top piece (the "v") of the pocket, right side down, and lastly on top was the pocket bag, right side down. This was kind of difficult because the V of the pocket top in between the other layers was upside down at this point, so its edges went in different direction than the pocket edge and the edge of the pocket bag. So I had to sew down one side of the V, then readjust the V-shaped piece so the raw edges met again.

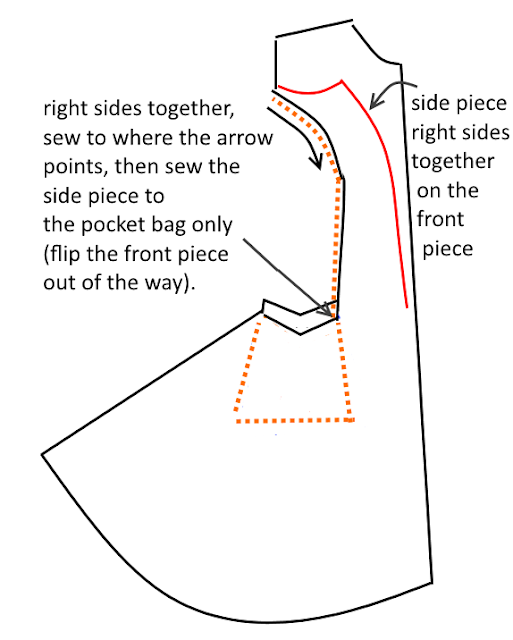
I was so concentrated on this part that there aren't any photos, but I made this awful drawing that might or might not clarify the process a bit:


When I'd connected the top V and the pocket bag to the front piece, I flipped the pocket bag on the inside of the front piece and ironed + top-stitched everything so it stayed in place.

After this, I sewed together the front center and the side front pieces. (I'd left the side front pieces long enough to act as the other half of the pocket bag). Placing the pieces right sides together, I sewed down from the armhole curve along the princess seam until I reached the V of the pocket. Then I flipped the front center piece out of the way and continued sewing the side piece on the pocket bag only. After this was done, I had a pocket with no visible seams on the outside of the coat.


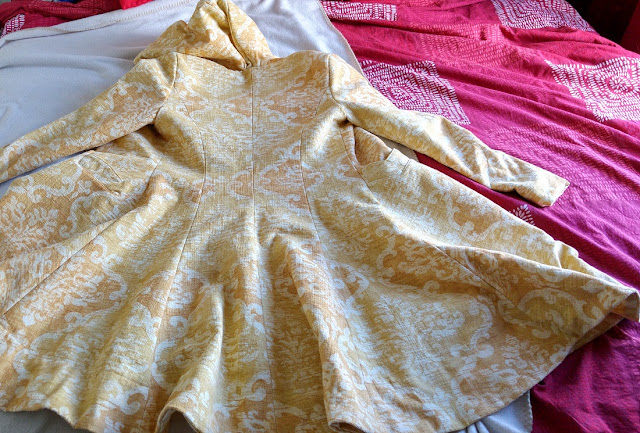
I repeated the process on the other front pieces, then pieced together the backside of the coat.

Front pieces done.


Back pieces done.


I sewed the front and the back together at the shoulders and side seams, attached the sleeves, and it was starting to look like a coat:


Next I cut out the lining:


The lining was also a secondhand fabric (2 euros). There wasn't quite enough of it, so I had to cut the sleeves from another fabric (so they're red, but it's not like they're going to be visible anyway).

Since I didn't need to repeat my pocket escapades on the lining side, I simply sewed the front lining pieces together like this:


The lining assembled (without sleeves):


Onwards to the hood!

My hood pieces looked like this:


I traced the neckline of the coat while it was folded in half (so that the center back seam was on the other side and the front lapels on the other). I then drafted the hood and cut it out. I then realized that the hood was too small for me and I didn't have enough fabric to cut new hood pieces (I needed four because the hood would be fully lined). So I cut a strip of fabric that was sewn between the hood pieces. It made the hood the size I needed, plus it ended up looking rather nice for a mistake so I'm not complaining. :D

Here's one half of the hood sewn together:


When I had two identical hoods, I simply sewed them right sides together at the front, flipped the hoods right side out and top-stitched near the edge. Then I sewed the hood on around the neckline, along with the neckline facing and some bias tape from which to hang the coat.


In the above picture, you can spot some pins on the coat front. I realized too late I'd made the middle front pieces too wide, so the coat sagged across my chest. I'd already attached the lapel facings, and since I'm lazy and don't want to seam-rip if I can avoid it, I fixed this by making identical pleats on both sides and top stitched them down so the coat would fit me. My lazy seamstress hack worked, and the pleats actually add a nice visual detail on the coat. As for the lining, I simply trimmed the excess off the mid-center of the pieces before attaching it to the lapel facings.

Before I could attach the lining, I had to make buttonholes in the lapel. I made three triangular bound buttonholes as shown in this tutorial and three triangular holes on the backside of the lapel.


Then I hand-sewed the front and the back of the buttonholes together.

While watching Stargate SG-1, of course.


With the buttonholes done, I could now attach the lining. Right sides together, I sewed the neckline first, then down the lapels. I turned the coat inside out through the not yet finished hem, dug the sleeves out and attached them next. The hem was finished with a wide facing.

I used the fabric scraps to cover some buttons (I used the same set of buttons I used for my last coat as well), put the coat on to see where the buttons would go, and hand-sewed them on.

I actually made the buttons before the buttonholes, so I made four though I ended up needing only three.


***


And the coat was finished!


***


And here's how it looks worn:


***


I didn't keep tabs on how long it took me to finish this coat, but I made it over the course of four days (but I wasn't sewing all day every day). If I had to guesstimate, this coat probably took me something like 20-30 hours to make.

The fabrics for this project, including iron-on interfacing, cost 15 euros altogether. All fabrics except for the interfacing (and the red fabric for the lining sleeves that was leftover from my husband's cosplay) were purchased secondhand.
The buttons cost about 1 euro, as they were from a package I think cost like 2-3 euros.
I can't accurately calculate how much thread, electricity etc I used while making this coat, but all in all, this project probably cost me around 20 euros (not including the time and effort, of course).

20 euros for this coat? Not bad at all. Or what do you think? :)

love,
Satu / Sew Scoundrel


Wednesday, August 3, 2016

Making of my Big Sister cosplay (Bioshock 2) - part 2


Hello everyone,
this is part 2 of my Making of my Big Sister cosplay. For part 1, click here.

***


(Click on images for a bigger version.)

So in the last post I'd just spray painted the helmet silver. After the spray paint dried, I started weathering the helmet to make it look worn and old and, well, not so shiny.


I used the technique from this video. I used some acrylic paints and some of my husband's old miniature paints. I mixed up black and brown, added some water, painted a small area making sure I got the paint in all the creases and then dabbed the excess off with a damp cotton ball. I did this to the entire helmet and the still unglued window frames. (The window frames were spray painted with copper and gold prior to the weathering process.)

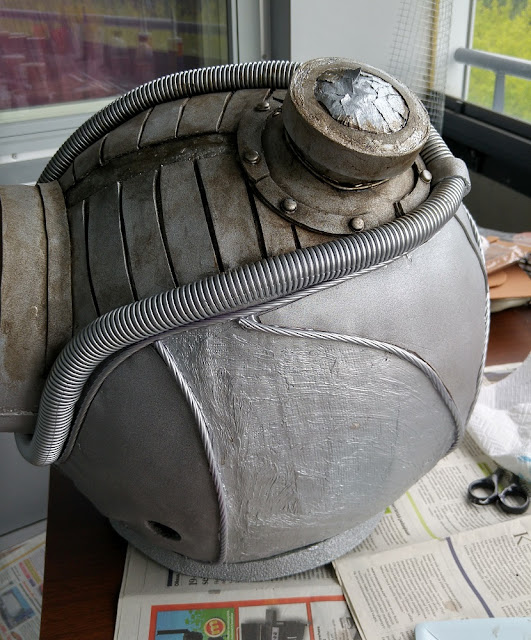
Meanwhile I was also building up the oxygen tank and the adjoined Little Sister basket. The oxygen tank was made with some wire netting and a piece of a sleeping pad, plus some craft foam, a styrofoam ring, bottom of a yogurt container, another serger thread cone, a soda cap etc.


The top of the tank is actually a lid. It comes off so I could still work on attaching the Little Sister basket onto the tank later, and figure out how the tank would be attached to me eventually.

I then made the basket, using strips of craft foam and a single "row" of wire netting. I placed the wire netting in between two strips and glued everything together with hot glue so the netting was completely hidden between the two layers of craft foam.


When I had six long strips, I assembled the basket by folding the strips around one another and hot gluing the entire thing together. At some points I also used steel wire to reinforce the basket, and then glued more craft foam on top of the wire to hide it.

The ends were attached to a sturdy piece of cardboard and some sleeping pad pieces with actual bolts-and-nuts. Washers were placed at both ends to prevent the bolts from slipping through the wire netting.


The basket was spray painted with copper and later on weathered. The tank was spray painted black, dry brushed with dark blue and the top was painted red and then weathered. The tank rings were dry brushed with dull metallic color.

After the paint dried, the basket could be attached. This is how it then looked:


***


After weathering the entire helmet, I added lights. I bought a set of battery-powered LED lights for 10 euros. I made a pouch for the battery pack from pieces of sleeping pad and glued the pouch to the back of the inside of the helmet.


Next I glued the lights in place around the windows using pieces of craft foam. When I was happy with the placement of the lights, I glued the window frames on, with the red office divider inside the frames as "glass". It was starting to look like a Big Sister helmet!


I started working on the chest plate next.

The base is two identical pieces of sleeping pad, glued together with wire netting sandwiched in between for support so the piece keeps its shape. The piece is longer at the back so the tank can be attached later.


A "collar" that matches the sleeping pad ring on the helmet was added to the chest plate. I also added some corset lacing string on the back and the front so the chest plate could be anchored around my torso. (The front strings can be seen hanging below the chest plate in the next photo.)


I needed to cut the chest plate narrower at the shoulders, so then I had to cover the edges with craft foam to hide any poking pieces of wire. I also added some rivets (bottle caps) on the chest plate. The actual edges of the chest and back were cut separately from craft foam and painted copper, whereas the plate itself would be silver.

"What? This is my normal bathroom selfie look!"


The red arrow in the mirror selfie points at a hole I cut in the collar, and it's housing a bluetooth speaker! So I could play actual Big Sister sounds (more like screeches) from my phone via the speaker. I made a craft foam ring around the hole I cut to hide the raw edges.

Next up, shoulder plates!

I used this blog post as my guide. Following the blogger's example, I used a styrofoam hemisphere as a base for the bigger shoulder piece, topped it with pieces of sleeping pad and decorated the shoulder plates with craft foam and some random caps and things as rivets.

(This post is not sponsored by Fanta. :P)


The chest plate and shoulder pieces were spray painted silver and the copper edges glued to the chest plate.


The shoulder plates attached to the chest plate with zip ties to allow for some movement. Everything was weathered using the same technique as with the helmet.


***


At this point I realized that if my armor was going to be all worn and weathered, I couldn't don crisp clean white (or even ivory/cream) clothes underneath. At this point it was two days til Ropecon, and I didn't have much time left, and lots to do still.

So I quickly made a huge pot of black tea (using like 40 teabags), let it steep for 20 minutes. Then I fished the teabags out and left the clothes to soak for about two hours.


After I took them out of the tea bath, I rinsed the clothes in cold water with some vinegar and ta-dah, the clothes were a lovely shade of tattered yellow.


(They also smelled like tea. Which meant that when I started sweating in my costume, I also smelled like tea... XD)

At this point, I was in such a hurry that I didn't stop to take many pictures. I made the leg-warmer-guards (or whatever) using pretty much the same technique as with the waist corset. I made four of these altogether.


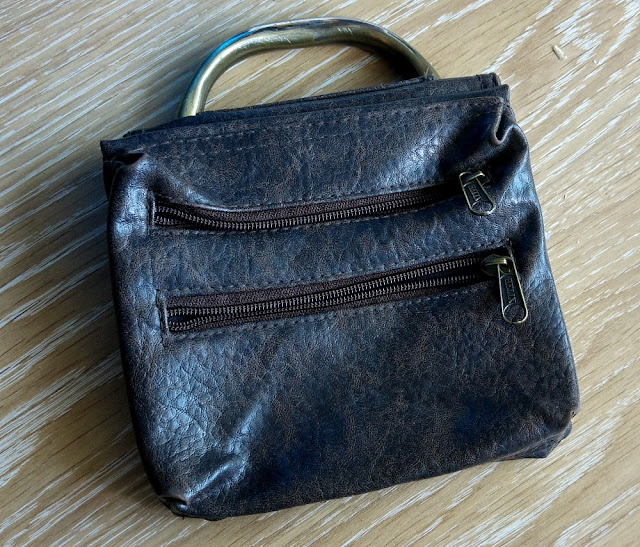
I was fast running out of the scraps from the secondhand leather coat, so I switched over to a brown fake leather backpack I'd thrifted earlier for 3 euros. From this, I salvaged the front pocket and the backpack handle, and made them into a kind of a "fanny pack" that was hanging from my hip with two ropes. The Big Sisters in some pictures are carrying something (that looks like an empty photo frame but I don't know what it actually is) on their hips, hanging there by a rope, but I decided I needed something to hold my phone, hotel key and some cash, so I made it into a fanny pack that matched the outfit.


I also cut off a suitable-looking piece and sewed it into a loop using two straps from the backpack: this was the arm brace for the arm with no weapon on it. The straps can be tightened and loosened to get the brace on and off. The fingerless gloves I was using with the outfit were recycled from an old steampunk outfit.


I just used a pair of boots I already owned for the cosplay. My shoes were actually black, but my husband splashed them with some brown spray paint to make them blend into the outfit a bit better.


My husband also made the arm stinger weapon. It was made with some styrofoam, a piece of a pipe that forks in y-shape, some old wires, another empty serger thread cone, reusable straws and an empty hair oil bottle. The hair oil bottle was filled with water that was dyed red with food coloring and it attached to the other fork of the pipe. The styrofoam plate attached to the pipe, and on top of that were actual old gate valve pieces my stepdad found in his father's garage.


I attached the leather backpack's closure mechanism and some straps etc on the arm stinger so it would go around my arm. I also dyed some water blue with food coloring. The water was inserted into the chocolate syringe I bought from New York, and it was attached to the arm brace with another two scraps from the backpack.


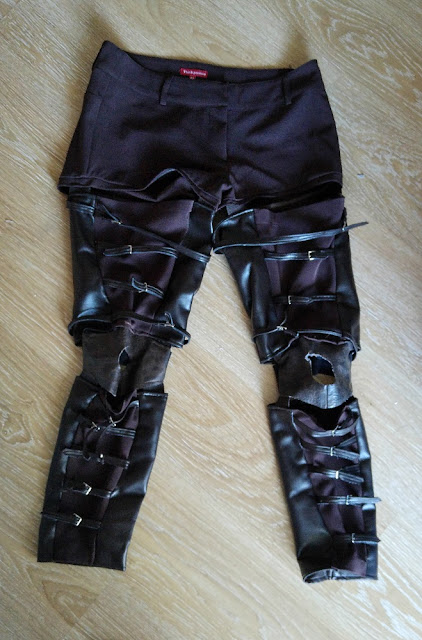
The pieces of the backpack were also used to make the knee pads, along with some wide elastic band at the back to make them stretchy. When I tried the outfit on, everything was all good, until I moved. Then the thigh guards and knee pads started sliding down in about three seconds.

So I took the remaining straps from the brown backpack and I sewed them along the inner and outer sides of the leg pieces, essentially making the shorts and leg pieces "pants". Some very, very weird looking strappy, buckled pants. :D


...Well, at least they stayed up this way.

Lastly I asked my husband to paint some fish on the tank, while I sewed some pink bows for the Little Sister basket.


The chest plate was strapped onto my torso at the front and the back with corset lacing strings going around my waist. The tank was then attached to the chest plate with three leather straps that went through the chest plate at the back, in and out of the tank a few wire netting holes apart and then buckled up between the chest plate and the tank. For added security the tank was also strapped around my waist beneath the corset using leather belts. Still the tank contraption was the most difficult thing, it swayed from side to side and needed to be fixed constantly. When I wear this next time I need to figure out a more secure fastening for the tank and the basket.

So here's the final result:

Photo credit: my husband


Photo credit: Lauri Maijala


Photo credit: Jani Mutikainen, awful drama filters by me.


We also met this hilarious guy who was dressed up as Deadpool in a bathrobe ("Edpool"). He took several pictures with me and my husband (dressed up as Warhammer 40k Imperial Missionary, with a gun hanging from his back), but at the time this guy didn't know who we were dressed up as... so this hilarity ensued on his blog:

Photo and story credit: stchucky

"Go-Go Death Star Head."
"Machine-gun Jesus."

Best. Thing. Ever. :'D


***


Walking around in the costume was entirely possible, if a bit difficult. I could see out of the main window, meaning I could see straight ahead, but not my feet or the floor ahead. My sides were completely blind and I couldn't hear properly. So mostly what we did was that my husband with his book-on-a-stick (patent pending) walked ahead of me and I simply followed the book, hoping I wouldn't crush any small children, hobbits or dwarfs underfoot, because I couldn't see anyone shorter than 4ft if they came up right next to me.

Not that I was walking long distances anyway... I was stopped fairly often for photos. People were snapping so many pictures of me, it was insane. I don't think I would have been able to stand all the attention with my own face visible, but this cosplay is perfect for hiding your face, so it was actually kind of fun! (I'm not shy or hate attention, it's just too much attention on me for too long makes me anxious.) People were telling me my cosplay was amazing, which naturally felt really good. And while most people taking photos probably didn't know the character I was cosplaying, quite a few did and came to talk to me about Bioshock. It was really cool and I loved talking to everyone and posing for photos.

I also participated in the annual costume competition at Ropecon, and after I'd already left on Sunday I was informed by phone that apparently I won first place on the "Individual" category. I find myself unbelieving this is true until I receive my certificate in the mail, but a cautious "yay" might be in order? :D

(Update: I received confirmation in the mail! It's true! :o)

All in all, I'm very happy with how this came out. I've never built a cosplay of this scale, so I'm very pleased with how it turned out. Of course there are a few things I could have done differently and saved myself some time and trouble, but it's a learning process. I'll know better next time.

Total time it took to make this cosplay? I don't know the exact amount, but a 100+ hours.
Total cost: something like 250€. This included all the materials bought for this project - but not all of it was used, so there's some left over for the next craft project (like craft foam, wire netting, hot glue gun and glue sticks etc). But this is definitely not the cheapest cosplay to make. Ordering stuff online would probably have saved me quite a lot of money - well, like I said, had I gotten this idea earlier... I personally think it was well worth the money. I mean, cosplay is a hobby. Hobbies sometimes cost money. I don't have other hobbies that cost this much, so I can afford this once-in-a-lifetime project. (No, I don't think I'll be making another cosplay of this scale of complexity anytime soon.)

***


Well, if you're still with me after all this rambling and billions of photos, thank you very much for reading! If you have any questions or thoughts, feel free to leave a comment!

love,
Satu / Sew Scoundrel