A while ago an anonymous reader commented on my post about the comic strip curtain dress, asking if I could make a tutorial on how I make my dress bodices.
So, here it is: how to make your own princess seam bodice pattern from scratch.
Before we begin, I must emphasize that I am not a professional seamstress / tailor and my methods might not be the best or most efficient out there, but here is my way of making a dress bodice that fits perfectly.
Also note that this is a somewhat of a tedious process, because first we make a pattern, then sew it into a mock-up, make adjustments and then cut the mock-up and draw the final pattern from that. But then again, once you have made the pattern, you can modify it to make different necklines, add sleeves and whatnot, and you know the finished piece will fit you perfectly! So in the end it's worth the trouble because you'll have an adjustable dress bodice pattern that's made to your measurements.

You'll need:
- Pattern paper / newspaper / package paper / any paper that's big enough to fit your pattern
- Scissors
- A ruler
- Measuring tape
- A pencil and an eraser
- Paper to write your measurements on
- A tank / sleeveless shirt for the armhole curve
- Scrap fabric (an old bed sheet or something else you're willing to sacrifice)
- Your choice of fabric for the bodice + lining (can be the same fabric; or bodice fabric + different lining fabric) 1-1.5 yards altogether, as half-ish yard is usually enough to cut the pattern pieces once - so a bit over half a yard for dress fabric + a bit over half a yard for lining.
- A sewing machine, thread etc.
- TIME. :D
First, measure yourself. For this, wear the bra you'd usually wear with the dress you're making. It's also a good idea to wear leggings or tights and pull the waist up where you want the waistline of your dress to be, because this helps to determine how long the bodice should be.
Here are the measurements you should mark down:

A = Half of your bust circumference (or if you want the side seam to be further towards the back, add an inch or so here - just remember to subtract it from the back pattern piece or you'll end up with a too-big bodice).
B = Armpit to waist, from the upper edge of your bra band down to where you have those leggings / tights. If your bra band is sitting very low on your ribcage, you might consider adding an inch or so. In commercial fit-and-flare / circle skirt dresses this measurement is usually something like 18-20cm (7-8 inches) for a dress that has a 50's style high waist.
C = Shoulder width from strap to strap, or however wide you want the dress to be at the shoulders.
D = Half your waist circumference at the waistband of your leggings / tights.
E = Shoulder to waistband at the front.
F = Shoulder to waistband at the back. It helps if you have someone else to measure this for you, but this is usually slightly less than the front measurement (because of lack of boobs in the back). The bustier you are, the more difference there is between the front and the back. Mine is about 2-3 cm (~1 inch).
G = From how low you want your neckline to be to the waistband of the leggings / tights. Note that once you have a pattern it's easy to adjust the neckline to be higher or lower when reusing the pattern. In my example the neckline is v-shaped but you can make it round as well. Also make a note where your center neckline is in relation to the fullest part of your bust (as in, how much higher your neckline is from where you measured your bust circumference in A).
Once you have your measurements, it's time to spread out the paper you're drawing the pattern on. For this you'll also need the ruler and pencil.
Note that for the front we're only drawing half of the pattern and the fabric is then cut on fold.
First, draw a straight horizontal line that is D divided by two (or quarter of your whole waist measurement). Then at the other end of this line draw a vertical line that is the length of E (shoulder to waist front) at a 90 degree angle. On this line, from the bottom up, mark the length of G (center neckline to waist).

The black line that is marked G is the center front (fabric will be cut on fold at G. Mark this down on the pattern).
Then at the top of the E line, parallel to D, make a mark that's half the distance of C (strap to strap). Draw this line inwards towards E about 5-10cm (2-4 inches) depending on how wide you want your dress straps to be. Mine are usually about 5-7 cm. I also sloped the outer end of the C line down just a centimeter or so (0.4 inches) because normally people's shoulders slope down outwards and this helps the dress bodice to fit better.

Then you can freehand a line from the inner end of C to G (this is the neckline).

Next, mark a spot that's half your A measurement (or quarter of your bust circumference). This is where you need to know how much higher your center neckline was than your bust measurement. Mine was something like an 3-5cm higher, but I kind of eyeballed it here to be about 3cm lower from the top end of G. So, from the top end of your G line, subtract the difference and from this point outwards draw a mark that's half of your A away from the G line. (Sounds confusing, sorry! I hope the pictures make up for it...)

Now, if everything is going according to plan, when you draw a straight line from this to the outer end of D, it should be more or less the length of your B measurement (armpit to waist). If it's +/- 1 inch to your measurement, I wouldn't worry too much. Just draw a straight line between these two points (the vertical dotted red line in the picture below).

Also draw a line straight down from the previous spot, so that it's parallel to your G line. This will be the dart. Measure the width of the dart at the bottom.

Then we move the dart towards the center. I just kind of eyeballed this (and ended up moving it later on), but somewhere in the middle of the pattern piece should be fine, or a bit closer to the G line (so exactly how I didn't do here - it should be closer to the left side!) The dart should not come up to the fullest part of your bust, so leave it an couple of centimeters or an inch or so short (the fullest part of my bust was about 18-19cm from waist up, and I made my dart 14cm). Mark the width of your dart, then draw a line from the center of the dart straight up to where your dart should end. From this point, draw the sides of the dart so it forms a triangle with a straight line in the middle.

Note that I marked with X's the line that should be disregarded from now on. The straight line on the right is the one the pattern is cut on.
Then use a tank top or something like that to draw the armhole curve. You can just eyeball it too, but don't cut the curve too deep. It's easier to cut it deeper later than try to add fabric to a curve that's too deep!

So then you should have something like this:

Cut the pattern out. Also cut the dart.
I usually get lazy and don't want to do everything again from the beginning, so I then use the front piece to make the back pattern piece.
The back piece can either have the same neckline as the front if that's what you want, but I usually make the neckline higher at the back. I do this by placing the front piece onto the paper, then drawing a line that continues up. Like so:

The neckline can be as low or high as you like, and like the front it's easy to modify when reusing the pattern. Draw the shoulder seam and freehand the curve from center back to the shoulder. Draw the armhole curve as well. Make the back curve a bit shallower than the front. Remove the front piece and mark down from the shoulder the length of your F, then connect this point with the center back.

The bottom line should once again be 1/2 x D, and the right-side seam from armpit to waist should match your front piece's side seam. Match the length of the side seam first and then adjust the length of the bodice more towards the center of the back piece.

You can also just draw the back piece by tracing the front, just remember to make is shorter than the front or the waistline of your dress waist will slope down at the back. Also make sure the bottom line is 1/2 x D because there are no darts in the back. Also, in my case, I took a centimeter or so off at the center-top of the back piece because I know my shoulders are so narrow that there will be sagging at the back of the neckline if I don't do this. I could also add darts but I'm lazy so I do it this way. Each body is individual so you need to test what fits yours.
At this point, the pattern is done for now. I didn't add darts at the armholes / cut the princess seam yet because the size of the darts depends on the size of your bust.

I marked the front and back and since I didn't add seam allowances to the pattern, I marked on the pattern "no s.a." so I'll remember to add them when I cut the fabric. You can add seam allowances to the pattern if you like, or try and remember to add them before you cut your fabric. :D (I'd use something like 1.5cm or 0.5 inches' seam allowance except the dart.)
It's time to make a mock-up!
The left-hand side of the front piece should be placed on fold of your bed sheet or whatever scrap fabric you're using. The back piece should be placed on two layers of fabric but it doesn't need to be on the fold because it's two separate pieces.
Pin the pattern and cut it out (add seam allowances to everything except the dart).

Sew the darts, then sew the pieces together at the side seams and shoulder seams.

At this point, you can baste a zipper onto the mock-up to try it on. If you have someone who can help you, you can skip this step by having them pin the back seam about 1.5cm (~0.5 inches) from the raw edges while you're wearing the mock-up.
Here I'm testing out my mock-up, and I have to adjust the curve of the armhole at the front (I also ended up lowering the neckline a couple of centimeters). Make any necessary adjustments, like take in seams etc. at this point.
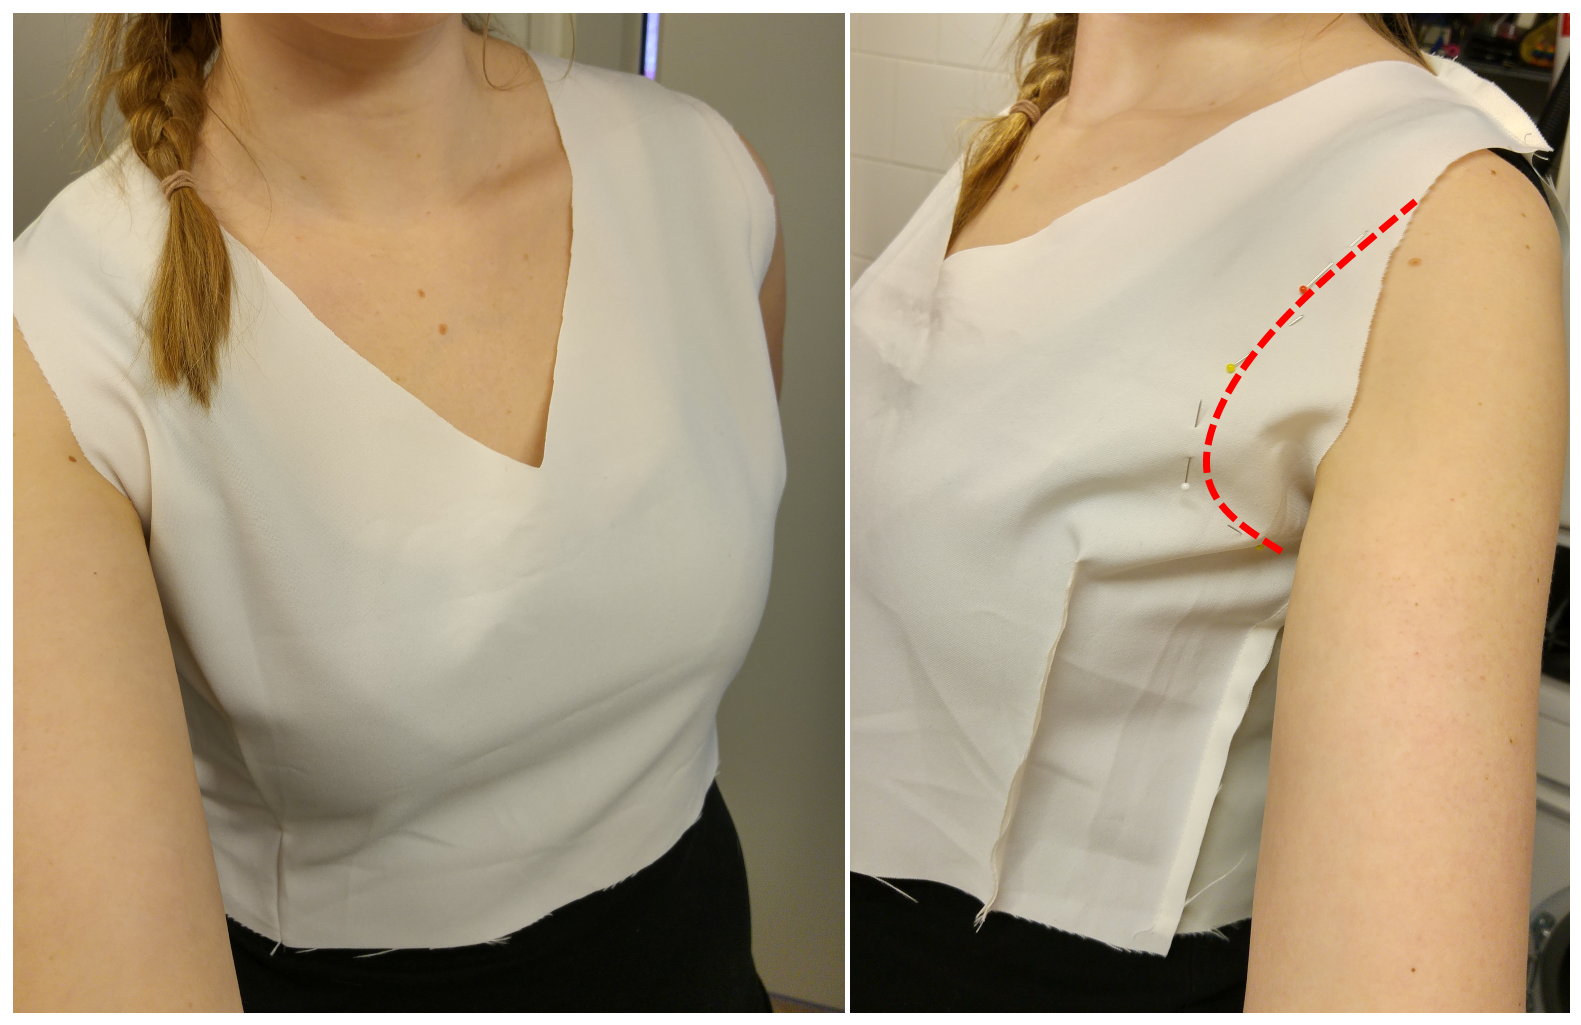
After cutting the excess fabric from the armhole curve, I put the mock-up back on so that the seams are on the outside. I then pinned the armhole curves so they sit flat over my bust, essentially adding a dart that connects to my previous dart. This will become the princess seam.
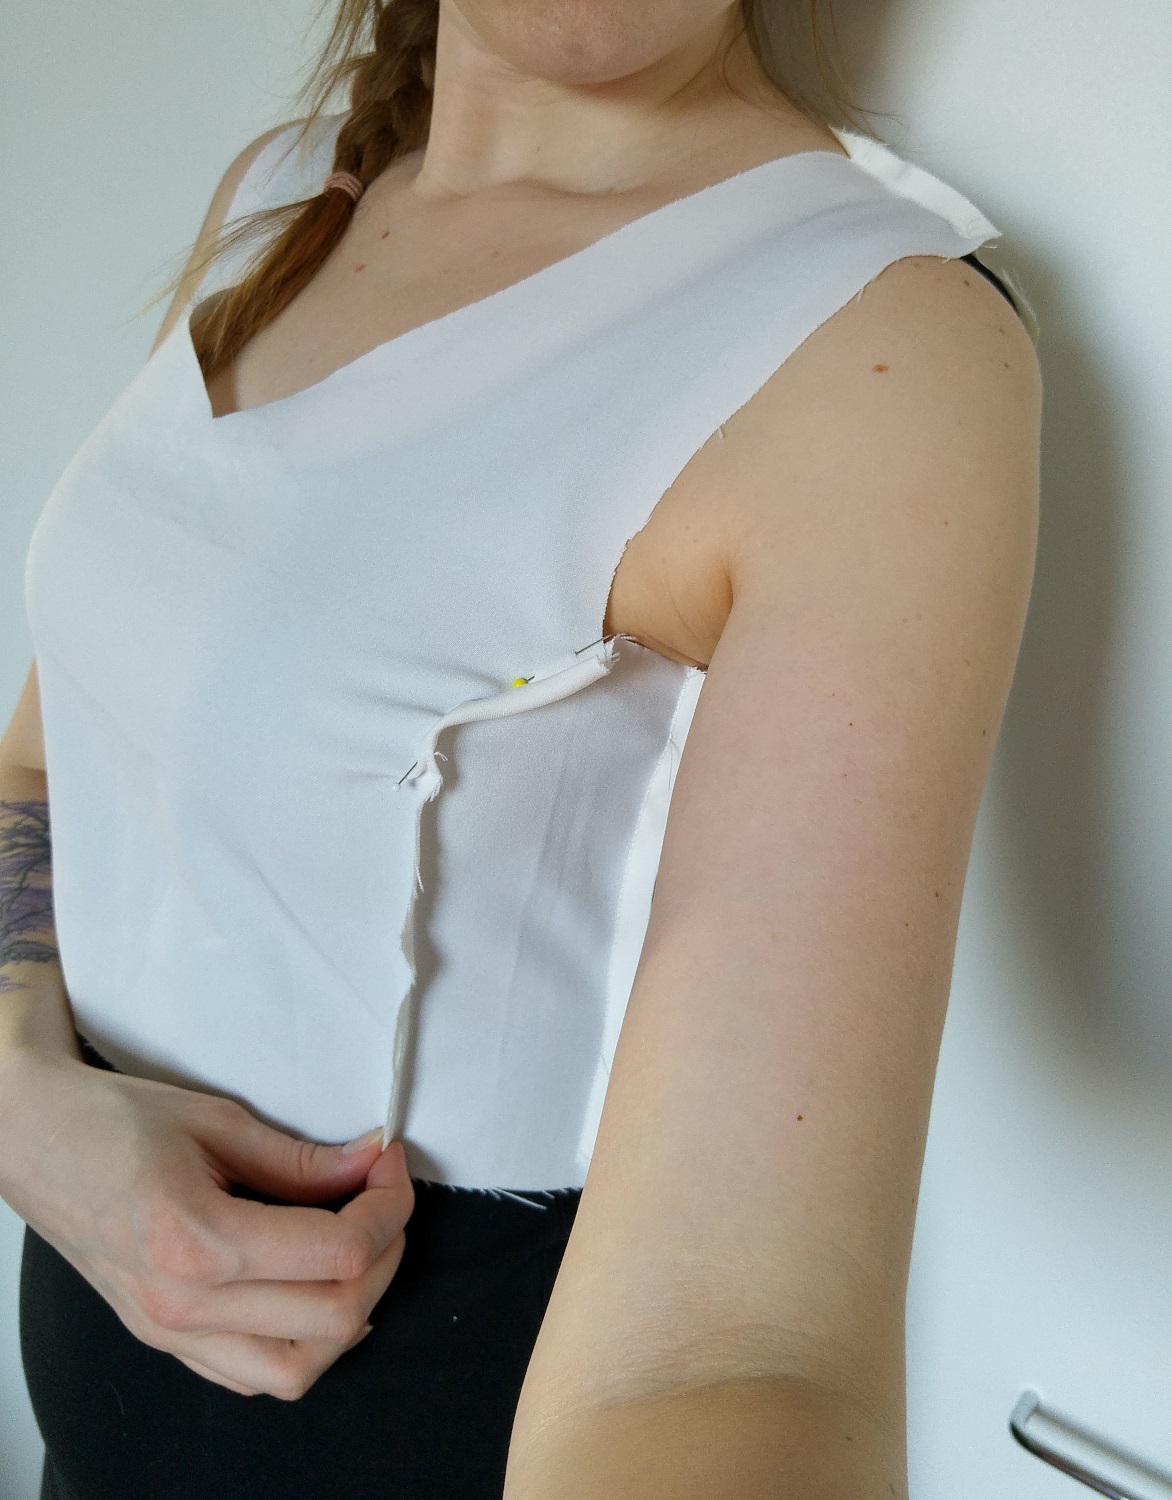
I marked and cut out this newly formed dart, then sewed the dart as usual.

Next, you're going to "undo" all your hard work and cut the mock-up to pieces again. :D
Cut along the seams and lay the pieces flat. I decided to move my waist dart towards the center, so that's why my front piece looks like it's cut funny. Iron the pieces flat if necessary.
(And at this point you ask, "couldn't we just have drawn a curved seam on the front piece in the first place?" Sure, you can do that, but I've found that for me at least this is the easier way, because by adjusting everything one step at a time I end up getting a bodice that fits like a glove. And people's busts are different, so this is the way to ensure that the dart in the armhole curve is in the exactly the right place for your bust. But if you want to, you can cut the princess seam to the front piece in the beginning, but then you'll probably have to adjust the seam of the curve later on.)
Here are my mock-up pieces after cutting: front center, front side, back.

Place the pieces on paper and draw along the edges. Note that the curved edges of the pieces don't necessarily look like they "match", this is because of the darts.

(At this point I actually deviated from the pattern, because I already have a princess seam pattern and I was making this one just for the tutorial. But I only changed the straps to be off-shoulder, so you can simply continue by drawing the straps as they were.)

So, after you have drawn and cut your pattern pieces from your mock-up, you now have a pattern that is made exactly to your measurements!
Here's my off-shoulder version:

(And don't ask me how I measured the off-shoulder straps - I didn't, I just kind of eyeballed them!)
Here are my lining pieces cut. There should not be a seam in the center - it should have been cut on fold - but I ran out of lining fabric and had to cut the center front piece in two pieces and sew them together. It doesn't matter because it's the lining, so it won't be visible to the outside of the finished bodice.
When you cut your fabric, remember to add seam allowance if you didn't add it to the pattern!

Here I have pinned front center and side along the curved edge. As you can see the seam looks like it "doesn't fit" but just pin it right sides together - it forms a curve at your bust, which is what it's supposed to do! :) Sew along the curved edge and repeat on the other curved piece + center piece.

(I sewed the center seam as well, but usually that's not a step because it should be one piece to begin with.)

Cut your back pieces. Sew the front and back pieces together at the shoulder seams only! Don't sew the side seams yet.
Then repeat these same steps for the actual dress fabric (cut with seam allowance, sew the curved side pieces to the center front, sew front to back only at the shoulder seams).
So then you should have two weird-looking contraptions like this, one from your lining fabric and one from your dress fabric (or they may be of same fabric if you chose to line the bodice with the dress fabric). Yours might look different since the shoulder straps here are off-shoulder style. But you get the idea.

And at this point, I will guide you to the Kitschy Coo blog. I see no point in repeating the steps here when there already are excellent instructions on how to complete the bodice from this point on. The Kitschy Coo method ensures there are no seams visible on the outside OR the inside of the bodice. Beautiful! Also, if you want to sandwich a zipper between the lining and the dress fabric, there are instructions for that here.
So here is my fully lined off-shoulder bodice made with my exact measurements:

(I also added boning so it stays up on its own, but that's another story...)
I then added the skirt part (floor-length because it's for a formal event, though I might chop it shorter once the event is over and done with).

Here's how it looks worn:


So. That was that. I hope you found this tutorial at least somewhat helpful. :) If something was unclear or you want to ask me anything, please don't hesitate to comment!
If you decide to make a dress bodice, I'd love to see pictures of it, so leave me a comment or tag your picture on instagram with #sewscoundrel.
Satu / Sew Scoundrel