Hello everyone,
So apparently my uni classes don't start until halfway through September. Well, more time for sewing! :D
The other day I went thrifting with
Stormiina, and I was explaining to her that I have "fabric phases". Like about a year ago I bought any floral fabric I could find in thrift stores (and I haven't gotten through half of the florals I now have piled up at home). Then about six months ago it was all stripes and plaids and more geometric patterns and prints (and I haven't gotten through half of the geometric fabrics I now have piled up at home).
...Maybe I have a fabric hoarding problem? (My husband would wholeheartedly agree, but we're not asking him...)
Anyway, I was telling Stormiina that I'm now
so over florals and stripes and plaids, and now it's all solid, one-color fabrics. Like, I need
solid colors because I don't have much of those. No more florals for me, nuh-uh!
And then of course at the very same moment I dug
this fabric out of the thrift store's fabric bin and immediately but it in my shopping basket.
So much for being over floral patterns, huh.
I don't know what the print is, exactly, but it reminds of fall foliage, red-tinted leaves on the ground; of forest walks on crisp autumn days. It's so lovely! The fabric is this kind of heavy-feeling non-stretchy rayon that has a nice drape to it. The fabric width was only 85cm (~33 inches), which makes me think it may have been intended as a curtain. However, there was 4 meters of it, so plenty for a full skirt.
I wanted to make a circle skirt that's also pleated. I've made pleats in circle skirts before (like with my
kimono sleeve bed-sheet dress), but this time I wanted
more pleats, but still a circle skirt. I like pleated circle skirts over pleated-only skirts, because they have so much more volume at the hem, without adding too much bulk at the waist.
So how do you make a pleated circle skirt?
When you calculate the radius of your circle skirt pattern (helpful calculator
here), you insert your actual waist measurement, so the waistline of the skirt fits your waist exactly. But if you, say, double or triple your waist measurement, you're left with a full circle skirt that can then be pleated to fit your waist. Of course you can also accomplish this by simply cutting out two or three full circle skirts and sewing them together, but my method uses less fabric because the hem of the skirt is still only one full circle, not two or three sewn together. (Also, yay for not having to hem like 20 meters of skirt?)
Since my fabric was so narrow in width, I had to play around a bit to be able to maximize the fullness of my skirt. I didn't have enough to make a full circle, but I did manage to cut out 5/6 of a full circle that had a waist that was double of my actual waist measurement. But with full-width fabric this task would have been a lot easier.
I'm going to go through how I made this skirt, but this isn't exactly a tutorial or a full set of instructions, because I'm not giving out any exact measurements or telling you what you need to do step-by-step. But I am going to explain in detail how I made the skirt, so maybe this is helpful if you want to make your own pleated circle skirt. And really, if you've ever made a circle skirt, this is easy! Just cut out your circle skirt with a waist measurement that's way too big and pleat it to fit. But anyway, here's how I did mine:
I started out by cutting a strip off the end of the fabric. This would be my waistband, and it was about 12cm wide (~4.5 inches).
Next, I cut out five identical pieces that make a 5/6 full circle skirt. I had a pattern piece ready that is 1/3 of a full circle, I simply folded it in half and cut five (because I only had enough fabric for five pieces).
I made mine about 65cm long (25.5 inches) because I am a giant and for me that's just about knee-length :D (By Hand London's circle skirt app claims that 61cm or 24 inches is a "midi" skirt, so apparently their length measurements only cater to hobbits.)
Using the leftover scraps I cut out 4 pocket pieces, because
all dresses and skirts need to have pockets.
I sewed two pocket pieces right sides together onto one of the five skirt pieces.
I took two more of the five skirt pieces and attached the other pocket pieces.
After sewing the pocket pieces on I ironed the seams flat and then serged around the pockets and all the sides of the five skirt pieces to prevent them from fraying. I then attached the skirt pieces at the side seams with a straight stitch. First the center front to the sides, sewing around the pockets:
Then the two remaining skirt pieces to the side pieces, leaving the back seam open:
I ironed the seams open after every step. So, after sewing the side seams I had a massive circle skirt that would have fit around my waist twice. I then turned my attention to the waistband.
I ironed some interfacing onto the backside of the waistband to help it keep its shape and look nice and crisp.
I ironed the raw edges in about 1cm (~0.4 inches) on both long sides of the waistband. I then folded the waistband in half lengthwise, but so that one side is slightly narrower than the other, so it's not folded
exactly in half but a tiny bit off.
I also folded the ends in so the waistband fit my waist but had some extra (for overlapping the waistband above the zipper that would be sewn in the back seam).
Starting from the middle, I then started pleating the skirt waist to fit the waistband.
When pleating, I made sure that the pockets were at the very "bottom" of the pleat, otherwise the pockets would look weird and might make the fabric warp funny in the end. So the seams with pockets in them were in the innermost fold of a pleat.
Now, I didn't calculate or measure my pleats in any way, I just eyeballed them and ended up undoing them a couple of times to get them look nice as well as fit my waist.
Once the pleats looked okay and the skirt fit my waist, I sewed across the pleats with a straight stitch to keep them in place.
I took my waistband and opened it, then laid the
narrower side of the waistband right side down onto the
wrong side of the skirt, raw edges meeting. I pinned it in place, making sure the fold of the waistband (1cm from the top edge) was
below the previous seam that was holding the pleats together. I then sewed straight along the fold, going slow and making sure the pleats stayed where they were supposed to.
So, narrower half of the waistband, right side onto the wrong side of the skirt, raw edges meeting and so that the topmost fold is below the previous line of stitches.
Once that was done, I folded and ironed the waistband open on the wrong side of the fabric. So this is what the inside of the skirt then looked:
Next, I folded the waistband over to the right side of the skirt and top-stitched it down close to the edge of the waistband.
This hides all the raw edges of the pleats inside the waistband, and since the piece of the waistband that's folded over to the front is a tiny bit wider than the other half, it also hides all the previous seams and stitches. So you're only left with a neat top-stitched waistband!
This is what the waistband looks on the inside:
Next, I added a zipper and closed up the back seam.
On the overlapping part of the waistband, I added two pieces of narrow elastic in between the waistband halves and top-stitched over the gap.
I marked on the other end of the waistband where the buttons should go to make the elastic closures functional, and hand-sewed the buttons on.
I hung the skirt overnight, then hemmed it. You're supposed to hang circle skirts for about a day so if the fabric warps on the bias you can then even it out and only then hem the skirt. It will prevent the skirt hem from going uneven later on. Some say the skirt should hang at least 24 hours, some say you should leave it for a week (!!!) before hemming it. However, I am impatient, so a week is not an option :D
...Well, my 24 hours wasn't quite 24 hours, either. It was more like 14 hours. After this I measured the hem from the waistband down and cut it even (it was a bit crooked probably because I wasn't too nitpicky about the pleats being exactly even at the top, not so much due to the hanging process).
Because of the hem-trimming, I didn't want to lose any more length to the hemming process, so I decided I was going to hem the skirt with bias tape - that way I'd only lose something like 0.5cm (~1/5 inch) and still get a nice, wide hem.
Unfortunately, I didn't have bias tape, or at least not in a color that would fit the colors of the skirt. So I had to make my own. I used a scrap piece of light gray fabric I had in my scrap fabric pile.
If you want to make your own bias tape,
here is a set of instructions for that. I don't own a "bias tape maker", so I just ironed the folds by hand, eyeballing it as I went and it turned out just fine.
I opened up one of the folds and pinned the bias tape onto the right side of the skirt, raw edges matching.
I sewed the bias tape on the hem along the fold line, starting about 2cm (or 1 inch) from the beginning of the bias tape. When I'd sewn around the hem and got back to the point where I started, I sewed the bias tape ends together so there wouldn't be any raw edges anywhere on the bias tape, cut the excess and then finished sewing along the folded line.
Then I turned the bias tape onto the wrong wide of the skirt, ironed and pinned it. Since the other edge of the bias tape was already folded in, this left a nice clean strip of bias tape onto the wrong side of the hem that I could then just top-stitch down near the edge of the bias tape.
The hem then looked like this on the inside of the skirt:
...and like this on the outside:
I ironed the skirt and it was all done!
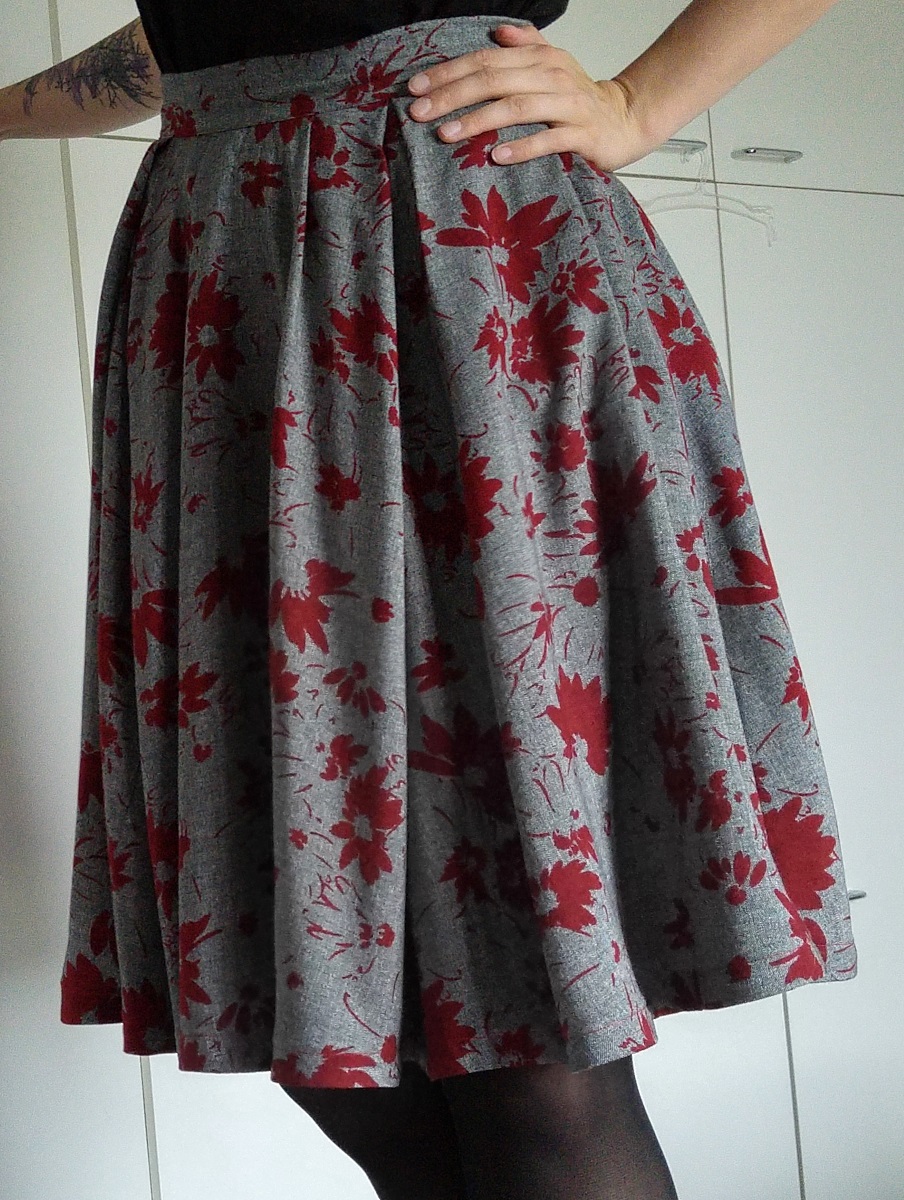
Here's how it looks worn (the first picture is without any underskirts and the rest are with a tulle petticoat).
Pockets!
***
I've been making so many stretchy pieces of clothing lately that it was nice to work on a non-stretchy project for a change. I really love how this skirt turned out!
So, what do you think of the skirt and the not-quite-tutorial? I hope it is of some help to you, and if you have any questions or comments, don't hesitate to leave me a comment below!
You can also comment/message me on Instagram:
@somescoundrel
love,
Satu / Sew Scoundrel