Monday, January 25, 2016

Comic strip dress from a curtain

...People have all kinds of methods of procrastination when they want to avoid schoolwork. Looks like mine is sewing. :D

I helped my friend Stormiina to move apartments over the weekend, and as we were unpacking her stuff she tossed all kinds of stuff at me that she didn't need anymore (like a couple of dresses and a Darth Vader shirt). She also gifted me a comic strip curtain she said she didn't think she'd use anymore.

(The comic strips contain quite a lot of spelling errors, but meh, whatever.)


I immediately saw the dress potential this curtain had.

I ripped open the folded edges and ends of the curtain and after that I had a 140x240 cm (~55x95-inch) piece of fabric - perfect.

I dug around my pile of fabrics and found a piece of thrifted white fabric for lining (1€) and a secondhand zipper (0.50€).


I cut the pieces for the top...


...and sewed them together beautifully with the help of this tutorial.


Seriously, I'd never before managed to figure out how to do the lining without having any unsightly seams on the inside, but that tutorial I linked above was very helpful and the results are really professional-looking.

Then I cut out a long rectangle for a waistband, set that aside and cut the rest of the curtain up into skirt pieces and assembled them into the skirt part of the dress. I had enough for about half-circle skirt (because I wanted the pattern to be right way up around the skirt, so I lost some fabric to that).


Then I sewed the waistband into a tube, attached it to the skirt, then attached the top piece as well. After that it was only a matter of adding a zipper, hemming the skirt and top-stitching around the armholes and the neckline. And done!


***


So, the cost? I got the curtain for free and the rest of the equipment I used for this project cost me 1.50€ (plus thread, electricity for the sewing machine etc...)

So maybe around 2 euros.

And it only took me one evening to finish this! :)

I personally love the dress! It's awesome but it's not "too fancy" to wear as an everyday dress. Some materials just end up looking way too fancy-schmancy when you make a circle skirt (or a half-circle skirt) dress out of them, but this looks like it can be easily dressed up or down depending on the accessories paired with it. All in all, a very successful DIY project.

Stormiina, thanks so much for the curtain! You're the best! ♥

What do you think of this dress? :)

love,
Satu / Sew Scoundrel


Tuesday, January 12, 2016

A new backpack! (Star Wars this time)

I know I made a Stargate backpack just last fall, but I decided it was time to make a new backpack because the old one is kind of hastily made and there are several parts about it that I don't really like. For example, I didn't bother to use interfacing so the backpack is kind of slouchy and doesn't hold its shape very well. So this time, I followed instructions on a Finnish blog called Villa & Villa and made a Fjällräven Kånken replica. This time around I used iron-on interfacing, and it really did help a lot!

In fact, the interfacing was the only part of this project that was bought new! (I used about 3€ worth). Everything else was either bought secondhand, gotten for free or made of things I already own. Thumbs-up for recycling!

- The main fabric is a thrifted tablecloth (4€ - I used only about 1/5 of the entire tablecloth, though, so 0.80€ for this project).
- The lining is also thrifted fabric (2€ - same thing, I only used about 0.40€'s worth).
The (fake) leather parts are from a thrifted belt (0.20€) and my old backpack (which I'd previously used parts of when making this smaller backpack).
- The longer zipper is from a thrifted hoodie that I'd previously slashed into pieces for other sewing projects (like the the totoro pockets of this dress). The hoodie cost me 1€ when I bought it, so the zipper is like... 0.10€?
- The shorter zipper for the outer pocket is thrifted (0.20€), as well as the zipper for the pocket in the lining (0.20€).
- The nylon strap pieces are thrifted (0.50€).
- The inner pocket is leftovers from making pockets for my winter coat.

So, all in all this backpack cost me... something like 7€, including things like electricity and thread etc. Pretty cool. ;)

And here it is!


(Note the Star Wars Rebel Alliance logo. Apparently I am incapable of making a backpack without some kind of geek reference.)

So this was just a quick back-to-school-after-the-holidays project. I probably won't have that much time for sewing for a while because I got a shitload of courses and a BA thesis coming up. But I'll try to make time for some sewing projects anyway (and most likely I'll end up doing more sewing than studying, because what better way to procrastinate than sewing, eh? :D)

Until next time!

love,
scoundrel / Satu


Sunday, January 10, 2016

Winter Coat (a four-day-mission)

Hey all,
So I decided to make a winter coat from scratch. Without a pattern. And it actually turned out quite good?

...what is this sorcery?

***


I had this thick gray wool fabric I found from a secondhand store for 4 euros, and I decided that what the hell, if this fails, I'll only lose a few euros and some of my time.


So I made a pattern. It is a combination of an existing coat I own and some wild imagination (inspired by this coat here). I didn't have any pattern paper at hand because I'm more of the type who just measures and pins fabric and chops away, but this time I decided it might be better to be precise since I'd have to cut out the same pieces from my lining fabric as well. I had an old Burda pattern I'm pretty sure I'd never need (because it's a simple shift dress and I've made several of those before without a pattern), and so I simply drew my coat pattern on top of the uncut Burda pieces. (So that's why it says "Burda" on some of my pieces if you zoom in on the next photo.)


(I had to make some adjustments as I progressed but basically that was the pattern I used.)

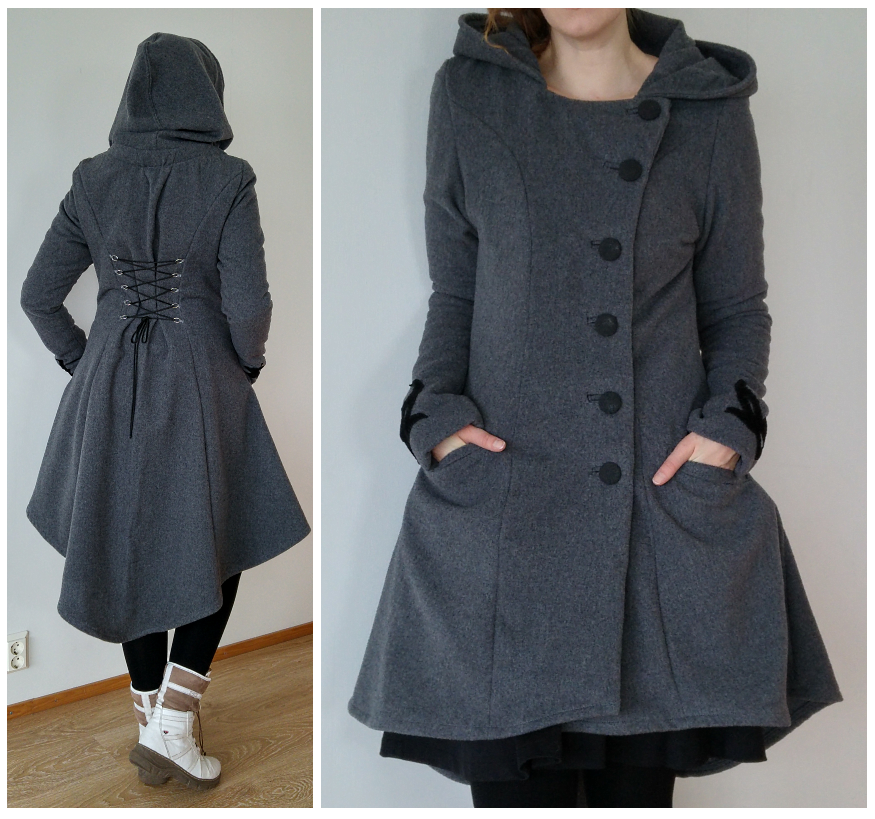
I made the pieces a bit too wide at the waist on purpose, because I was planning on adding decorative corset lacing to the back. So I did.

I figured out where I wanted the lacing to be and then sewed the rings on the center back piece, then sewed the back side pieces onto the center back piece.


I then assembled the front (front side piece + front center overlapping lapel piece) on both sides and sewed the side seams and shoulders.


I sewed and attached the hood.


I made a facing for the hood and later hand-stitched it (ew hand-sewing) so it stayed on the inside of the hood but the stitches aren't visible on the outside.

I then attached the lapel facings and sleeves.


I made a facing for the back seam where the hood is attached, and also used some gray bias tape to make a loop from which to hang the coat.


Then I took some of the fabric I got from my grandma-in-law last summer.

That one right there.


All of these fabrics are Finnish vintage (!!!), and I decided it was time for this fabric to be used. I cut out the lining using my pattern, assembled the lining and left it waiting to be attached.

But first, I needed to make buttons.


I wanted to make the buttons from the coat fabric but it was too thick to make these kinds of buttons, so I opted for a darker gray fabric I had left over from a previous project. I bought these DIY buttons from the cheap store called Tiger for 2 or 3 euros.

Then it was time to make buttonholes. I had seen pictures of bound buttonholes on Pinterest and I wanted to make those. I decided where I wanted the buttonholes to be and got to it.


Sure, bound buttonholes are time-consuming to make but in my opinion well worth the effort. If you're interested in making bound buttonholes, here are two good tutorials: Craftsy has a well-explained basic tutorial and Lolita Patterns also tells you how to make the backsides of the buttonholes pretty as well (because in the very basic version the back isn't very pleasing to look at).

I also figured out where the buttons should sit on the opposite side and sewed those on. (By hand, ugh.)

Next I made single-welt pockets on the front side panels using this easy tutorial on YouTube.


Then I attached the lining with the help of another YouTube tutorial.


I hemmed the sleeves by attaching the lining and the main fabric together on the inside of the sleeve so no seams were visible on the outside (more hand-stitching, oh yay...)

Then I decided I wanted the sleeves to have suede details! (If I ever get this idea again, whack me with something.)

I drafted a pattern (inspired by the corner of a tablecloth I have :D) and cut it out from secondhand suede scrap piece (which cost me like 50 cents). I cut the pattern on fold to make it symmetrical.


I put a few dabs of fabric glue onto the suede pieces to hold them in place and then I sewed. And sewed and sewed and sewed. It took hours. Many, many hours. The suede was difficult to sew through and since I'd already hemmed the sleeves, I had to be extra careful to only catch the topmost layer of fabric so the lining would still move freely in the sleeve after the suede was attached. It was a pain in the ass (and fingers, because I pricked them all the time while sewing the decorations on). Buuuuuuut then again, I like the end result.


So then it was only a matter of hemming the lining and the actual coat fabric, and the coat was done!


And this is what it looks like when I'm wearing it:


I also took the coat outside for a test ride. It was very warm and cozy. Perfect!


***


So, this project took me four days to complete. I didn't count actual hours but I'd say this took me something like 30-40 hours, including the making of a pattern from scratch. So even though the materials cost me only about 10 euros altogether, if I were to count an hourly salary for myself, this would be a friggin' expensive coat. :D

So, what do you think of my winter coat? (And my new blog cover photo?) :)

love,
scoundrel / Satu


PS. I also changed my blog name... the old one wasn't very descriptive of what this blog is about these days... so from now on this blog will be "Sew Scoundrel". Just because. :D You can also find my sewing-related photos on Instagram under the hashtag #sewscoundrel :)

Sunday, January 3, 2016

Oh Deer (pun intended) - it's a dress!

Heya,
Recently I became part of a Facebook group called "Make Thrift Buy Community Challenges", which is a group created by the wonderful Annika Victoria. She hosts a YouTube series called Make Thrift Buy, in which she recreates suggested clothes and accessories by being awesome and thrifty. The Facebook group is a group in which the members vote on what piece of clothing we should try and make for ourselves. Then we get creative, make the chosen piece whichever way feels best for us and share the results with the group. It's a lovely community and I'm happy to be a part of it.

That said, this month's challenge was a deer hoodie, which looks like this:

From here.


I am not really a hoodie person, as you might be able to tell by my blog, so I decided to do something else deer-related instead.

Here's my draft:


I found like 6 meters of brown corduroy at a secondhand store for 6 euros and a piece of cream colored fabric for 1 euro.


So, seeing as I already had a zipper (0.50€ from a secondhand store), I was all set.

I cut the top pieces (princess seamed)...


...and pieces for the skirt part:


I sewed the top pieces and made a facing for the neck and arms.


I then assembled the skirt and inserted a waistband:


Since the hem was angular when assembled, I simply measured 57 cm from the waistband down all over the skirt to get an even hem and serged around the entire thing.


So then when all sewn together, the dress looked like this:


***


So then I moved onto the antlers and other decorative pieces.

I measured the length and curve the antlers would have to be to fit the neckline and drafted this:


It's drawn on self-adhesive plastic, because then it was easy to stick it to a folded up piece of fabric and cut out four identical pieces:


I first tried to sew one pair together right sides together and turn the piece inside out, but the fabric was too thick and the antler details too small for that to happen. It was a disaster, so I tossed that. I traced and cut two more, added some iron-on interfacing to prevent fraying and then sewed the pieces together right sides out. I trimmed the seam allowances and then I had these:


I figured out the placement of the antlers, attached them with some pins and then hand-sewed them onto the dress. I used kind of a blanket stitch to further prevent the edges from fraying.

So I sewed.

And sewed.

And sewed.

Seriously, it took me 7 (seven!) Stargate SG-1 episodes before the antlers were attached. I chose SG-1 to pass time because I've seen it all before so I was able to look mostly at what I was doing with my needle and didn't need to pay much attention to the screen. So it was all, stitch-stitch-stitch-laugh-at-O'Neill's-jokes-stitch-stitch-Teal'c-is-awesome-stitch-stitch-stitch-- ad infinitum.

(Have I mentioned how much I hate sewing things by hand? Well, I'm mentioning it again. And this little ordeal didn't really change that for the better...)

But then again, the end result just might have been worth it.


Then I cut out some circular shapes (and one heart like in the original hoodie) and kind of splashed them onto the back of the dress.


I sewed the pieces on with my sewing machine (because I was so done with hand-sewing) and used some fray check for prevent the edges from fraying. Then I just needed to hem the dress by turning the serged edge over once and top-stitching over it. And it was finally done!

***


So here is the finished dress:


(I was supposed to make pockets but I got lazy, but since the pocket type I was thinking of making is a single welt pocket, that can be easily added later on if I want to.)

And here's me rocking my dear deer dress!


***


So, what do you think? :)

love,
scoundrel / Satu