Hi again! This time I found inspiration from
this blog post. It featured a wool skirt with white piping details in the seams, with rough pattern and instructions on how to sew said skirt.
This skirt. (Picture from the abovementioned blog post.)
I fell in love with the pocket design. Such crisp elegance! And did I mention
pockets? I definitely have a soft spot for pockets in skirts.
I'd never used piping in sewing before, so I had a few problems. First, it was so late in the evening that no stores were open. And yes,
of course I had to try it right then, what are you crazy. I couldn't
possibly wait until morning, so I searched google on how to make one's own piping from scratch. Apparently it required fabric (
check.) OR bias tape (which I don't have right now) and round string (
uh oh. Didn't have that either.)
I managed to hunt down a couple of narrow, round shoelaces that I wasn't going to use anymore, and I made some piping. I tested it on a scrap piece of fabric to get the hang on how to sew piping into seams. It worked out fine, but I wasn't a huge fan of how it made the fabric all stiff. Piping is usually used in the edges of pillows, backpacks and such, and in these items it's all well and fine, stiffening up the fabric and keeping the form of the piece, but in a skirt? Not my thing.
So then I figured, maybe I could use the folded fabric without the string sewn in? As in, makeshift bias tape (folded only once). So I cut up some black fabric I had lying around, on the bias. I then simply folded the narrow strips of fabric over and ironed them.
Like so.
All rolled up and ready to use.
(Of course it's easier to use actual bias tape or piping, but if you're like me and get inspired in the middle of the night and don't have the necessary stuff at hand, then this works just fine. :D)
So now I had the seam details under control in the form of black, narrow strips of fabric folded once over. So what about fabric? I wanted to use wool as in the original skirt, and luckily I had purchased a piece of dark green wool fabric at a flea market for 5 euros. So then I just had to figure out measurements. And draw patterns. And--
--Scrap that, I'll just use the measurements of an existing skirt and then draw the design on a piece of paper.
Looks good enough to me.
I wanted to make a skirt that is a bit longer and more A-lined than in the inspiration blog post, so the skirt lying on top of the fabric was ideal for this purpose. So, I measured the existing skirt a bit and went to drawing.
It was said in the comments of the inspiration post that the front middle section should be a bit wider than the side sections with pockets, so I calculated the measurements according to that. I drew the skirt around 60cm long, knowing it would become a bit shorter with the hemming and all.
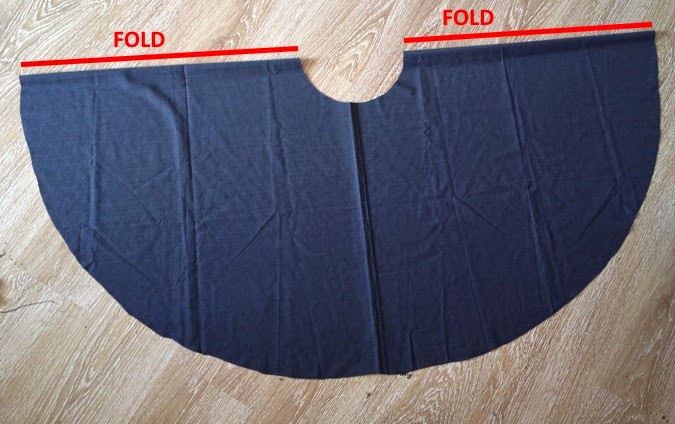
First I measured and cut out the back part. I decided to cut it out in one piece and add a zipper in the middle.
The fabric is folded over on the side of the red line.
Then, according my measurements on paper, I cut the two side sections where the pockets would be sewn.
There's two layers of fabric pinned together so I got identical side pieces.
Then I cut the middle front section according to my measurements and pinned the whole thing up to see that the size was correct.
Still looking good.
Then I cut out the pocket parts, the fabric folded so I got four pieces - two big, two small. I just put one of the side sections on folded fabric and marked where to cut to get the pieces to match the side section.
The original instructions stated that the pocket pieces need to be sewn together first, with the piping detail in the seam.
To sew the piping into the seam, you have to first sew the piping on the right side of the fabric with the raw edge towards the edge of the fabric. So if you're sewing piping on a seam it looks like you're sewing it upside down. Then you need to sew the other piece of fabric on top of this, right sides facing.
Here I used the shoelace piping. I pinned it onto the first piece of fabric, the raw edge facing up...
...sewed it on...
...and added the top part of the pocket section like so. I pinned it and then sewed it on the other side, following the first seam that was visible.
For this pocket piece I used the shoelace piping to help the pockets to keep a nice form. Otherwise I'd just use the "bias tape" I made in the beginning.
The original instructions say that you can feel where the thick part of the piping is so you can then follow that when sewing the other layer of fabric on the piping. I found this a bit tedious, and as I wasn't going to use piping except for the very first pocket seams, I had to come up with something different since there wasn't going to
be any thicker part in the bias tape I used. I figured out that if you put the pieces of fabric together, right side to right side, and then pinned it up on the other side of the fabric, you could still see the previous seam from when you sewed the piping into the first fabric. Then I just sewed along the same seam to attach the two pieces of fabric and leave the bias tape showing in between.
Next, I added the actual pockets in another fabric to make a nice lining in the pockets.
I first pinned and sewed the bias tape (or piping if you use that) on the top part of the pocket. Raw edge up as previously shown.
Then I cut up some thinner, gray fabric to make the pocket lining. I didn't do anything fancy, I just cut up a rough rectangle that would fit in between the side section of the skirt and the pocket piece I'd just sewn together with the piping detail.
I pinned the gray fabric on the pocket piece, right sides facing.
Again, it's easier to get the piping / bias tape detail to look more even if you sew on the side of the fabric where you can see the previous seam from sewing the bias tape on in the first place (as you can in the above picture, the one on the right.) Sew on top of that seam and the pocket lining is attached to the top of your pocket piece.
When you then flip the pocket lining into the backside of the pocket piece the pocket top should then look like this:
The pocket lining is showing to the ouside rather unattractively...
...so just pin it down, holding onto the visible small edge of the bias tape / piping and pulling down the lining and the wool.
Sew close to the edge and hey presto! A nice pocket opening right there.
Now it's time to attach the pocket onto the bigger side section. Lay the pocket piece onto the side section fabric and pin with two pins on either end of the pocket opening. Then flip the pocket piece over to reveal the lining beneath. Pin the lining onto the side section fabric, as demonstrated here:
Sew along the pinned line to attach the lining into the main skirt fabric. Then it is time to add bias tape / piping detail into the side sections with pockets.
This bias tape / piping will attach the pocket piece into the side block along the side seams. When you have done both side sections like this, you can attach them into the front middle section. Pin the pieces of fabric together at the side seams, right side facing right side. Make sure you're pinning the correct side seam to the front piece so your pockets run diagonally down from the middle section.
The red dashed line shows the pinned side seam, right side against right side of the fabric.
When you have sewn both sides to the front section, your skirt should look like this:
Then you can attach the back section into the side, right side against right side and flip it open to look like this. If you want to add a zipper to the side seam, don't sew the other side. I wanted a zipper in the back, so I sewed both side seams up and made a slit in the back for the zipper.
After you've attached the back to the front, it's time to make a waistband. I used the same method as I use for all my waistbands: cut up a strip of fabric a couple of centimeters longer than your waist measurement. It should be two times as wide as you wish your waistband to be, plus seam allowance. I wanted to do a waistband around 5cm wide, so I cut a strip of fabric that was about 12cm wide. Then I sewed the long edges together, right side against right side, and turned the tube of fabric inside out to reveal the nicer side.
With thicker fabric like wool, it's easier to turn the tube inside out with the help of a big safety pin.
Add bias tape / piping onto the top part of your skirt:
Pin the waistband on top of the bias tape / piping, right sides facing (once again), starting from your zipper slit either on the side or in the back. Sew on.
In the original inspiration post, the skirt was simply hemmed with a lining fabric, but I wanted to add bias tape onto the hem as well, so I did that. Once I'd sewn the bias tape on, I added a strip the same gray lining fabric that I used for the insides of the pockets. I sewed that on the right side of the skirt, making a seam between the wool and the lining with bias tape showing in between. I then flipped the lining back to the inside of the skirt and pinned it in place so that the lining was completely hidden and only the bias tape showing, as with the tops of the pockets:
I sewed the hem about 0.5cm from the bias tape:
That left me with a mass of lining fabric hanging from beneath the hem, so I folded it over, pinned it and sewed it around 2-3 cm from the previous seam.
So then the skirt was pretty much done, aside from adding a zipper in the back. As the wool fabric I used was very thick, I first pinned and sewed the raw edges around the zipper and only then pinned and sewed the zipper. The lower edge of the waistband was a source of many swearwords, as there was such a lump of fabric that my sewing machine almost couldn't get past it. :P
Done and done.
My skirt is subtler as it doesn't have such a contrast between the fabric and the highlighting in the seams as the inspiration, but I like it very much.
Rocking the new look.
I am really, really fond of the pockets in this skirt. And I love how well the whole thing turned out. Although, doing that much detail really takes its toll, time-wise, as it took me altogether about 9 hours to finish this skirt. So this wasn't a walk-in-the-park kind of easy sewing project. Sewing the bias tape on and only then adjoining the pieces of fabric is a massive amount of work in comparison to just slapping two pieces of fabric together and sewing them together. Still, despite the time and effort it took to finish this project, I'm actually thinking about making more stuff with detailed seams in them... They add a nice touch to clothing. ^_^
So, what do you think of the skirt? :)
love,
scoundrel