Showing posts with label skirt. Show all posts

Saturday, April 1, 2017

Floral vintage curtain into paper-bag waist skirt

Hello everyone,
A while back I found a vintage cotton curtain from a secondhand store.


It's Finnish design from the 1970s or the 1980s, I don't know for sure because apparently there were different color variations of this print and some of them were produced in the 70s and some in the 80s. But either way, the curtain is 30-40 years old, which is really cool! Parts of the backside were sun-bleached (apparently from where it had been exposed to sunlight while hanging over a window), but the right side of the fabric was flawless. I pre-washed it and the colors were still perfectly vibrant and the fabric altogether seemed sturdy and unharmed by time and sunlight.

I wanted to make the curtain into a garment, but I didn't want to cut into the print too much, and I wanted to preserve the selvages at the sides where the name of the designer is written. I haven't had many chances to sew with real vintage fabrics and I felt like it would be blasphemy to slice the fabric too much and make it into something too modern. I don't know, maybe it's just me, but I felt like I wanted to make this into something that would be worthy of the fabric.

So I decided to make it into a pleated paper-bag waist skirt. I got my inspiration from this post on Burda Style. I decided that I could easily keep the original selvages and make them into the hem of the skirt, and so I could use the fabric in pretty large pieces and keep the print intact.

So I cut the curtain in half parallel to the selvages. (I am aware that this makes the print run sideways on the skirt, but no one can tell when the garment is finished...)


I don't think I've ever been this scared of cutting into any fabric before. There was a nagging voice in my head telling me that if I failed this project somehow, it would be a waste of a vintage fabric that I probably wouldn't be able to find anywhere ever again... And even if the fabric wasn't that expensive for authentic retro (25€ for 135 x 170cm / 53x67" piece), I was afraid that I wouldn't do it justice somehow. True vintage fabric deserves to be made into something awesome, and I was afraid I was going to mess it up.

I trimmed the ends a bit so the fabric was in three pieces, one of them 110cm (~43") wide and the other two 65cm (~25.5") wide. All three pieces were 67cm (~26.5") tall, or half the curtain width.

Then I cut a long piece of slippery lining fabric that was as wide as all of the curtain pieces together (240cm / 94.5") and 5cm (~2") shorter than the curtain pieces.


Before attaching the curtain pieces together at the sides, I added pocket bags so I could have pockets between the pieces.


(The fabric of the pockets is another piece of vintage fabric I had lying around, it's one of the scrap pieces I got from my grandma-in-law in 2015. The piece was too small to make a whole garment so it became pockets for my skirt.)

I then sewed the side seams so the skirt was one very wide piece with pockets in the seams.


(In the above picture you can see what I meant by the "sun-bleached" parts visible on the wrong side of the fabric. But luckily it didn't have an effect on the right side of the fabric.)

I took the black lining fabric and the skirt pieces, and placed them right sides together and sewed along both of the long edges, leaving the short ends open. As the lining was shorter than the curtain fabric, when I ironed the piece the curtain fabric folded under by an inch both at the top and the bottom. I then had a fully lined skirt piece that was 240cm (94.5") wide and 62cm (~24.5") tall with neat, crisp edges at the top and the bottom and no raw edges visible anywhere except for the ends. So essentially, I had hemmed both the top and the bottom at the same time with minimal effort (the original selvages are still at the hemmed bottom, just hidden).


The next step was to mark and sew 5cm (2") wide inverted pleats along the top edge of the skirt. I made mine so that I sewed the pleats together lengthwise at the center of the pleat. Usually you sew across the pleat to keep in in place, but in this case I wanted the pleat to start 3cm (~1.2") from the top edge to get the paper-bag waist effect and I didn't want any horizontal seams or stitches at the waist.

Here I've sewn the pleats, but not yet ironed the "loops" on the backside into pleats. The yellow dashed lines indicate where I've sewn the pleats together on the wrong side of the fabric.


I ironed the backside of the waist into pleats and pinned them so they stayed in place:


I top-stitched the pleats into place with a staight stitch running down on both sides of every seam I made in the previous step:


So then I had a "waistband" that was pleated so the pleats open up 3cm above where the skirt sits at the waist, and no seams or stitches across the waist at all. This creates a kind of a paper-bag aesthetic, even though paper-bag waist garments are more often gathered than pleated. (But I prefer pleats to gathers, so that's why I chose pleating.)

(Spot the cat hair... they are everywhere these days :D)


I closed the back seam and left a slit for a zipper.


I sewed in the (secondhand) zipper...


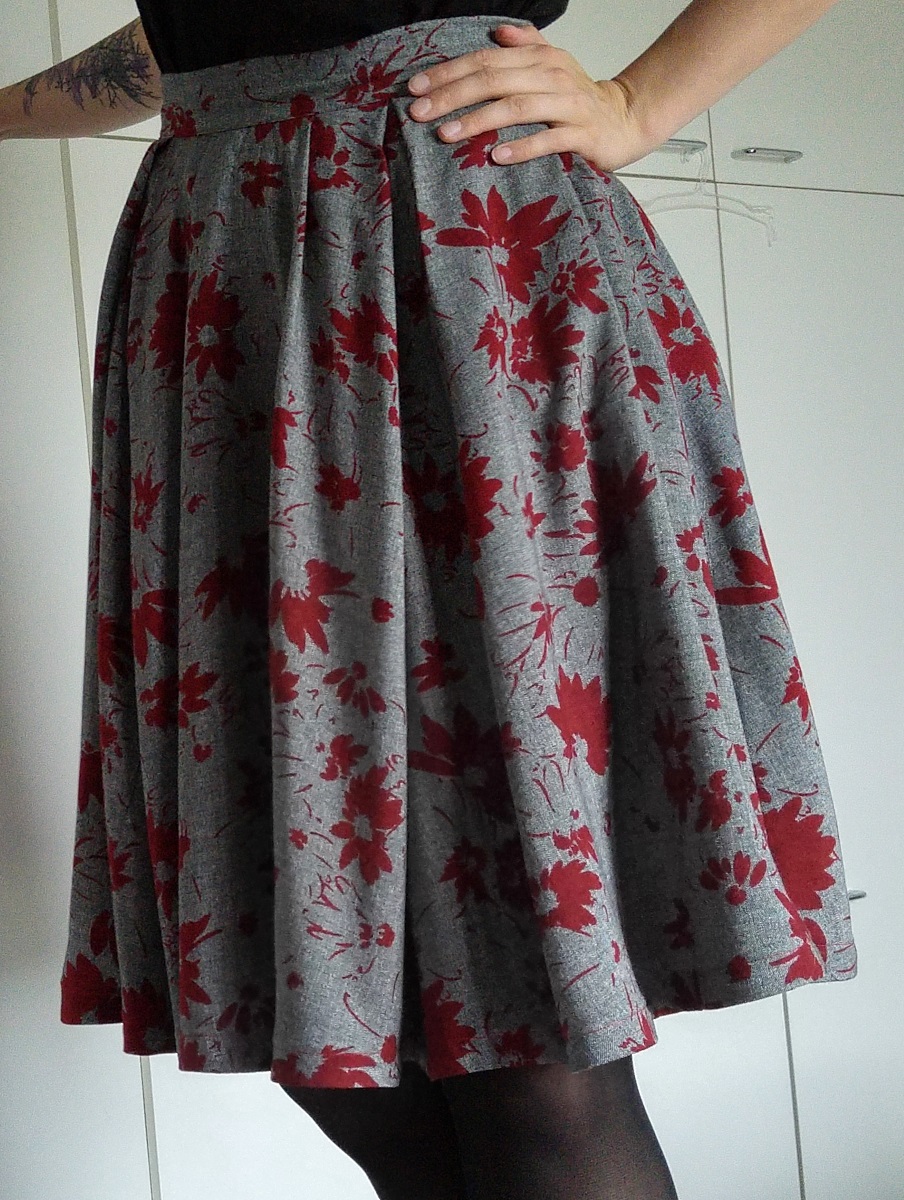
...and the skirt was done!


(Pockets! ^_^)


The full lining prevents the skirt from clinging onto tights or legs, and it also makes for a super neat finish at the hem:

(Also, cat hair... *sigh*)


I am very happy with how this turned out. I feel like the result is "worthy" of the amazing vintage fabric.

What do you think? :)

Love,
Satu / Sew Scoundrel


Tuesday, January 3, 2017

Video tutorial: circle skirt with geometric pockets

Hey everyone,
And Happy New Year!

Last fall I made my first video tutorial, how to sew a cape with pockets. As I discovered then, making videos is really time-consuming, and I didn't have a chance to make another video until now.

This time, I had scored about 3 meters (~3.2 yards) of light brown tweed fabric at a thrift store for 2 euros.

I decided to make it a vintage-inspired skirt with some fun pockets.


The pockets are inspired by this Pinterest pin about a 50's dress with fun pocket design. Sooooo to prepare for this project, I made pocket mock-ups... in my head, because making mock-ups with scrap fabric is for suckers--
Nah, just kidding. It would be wise to make mock-ups, but since I am lazy, I just planned it all in my head. And sometimes it works surprisingly well! :D

So, this not-planned, not-tested-out pocket design is now here for your pleasure in video form!

***


***


All in all, I think this project went surprisingly well, considering I mostly just winged it. The tips of the pockets aren't as sharp as I'd hoped (a problem I could have avoided by making the seam allowances wider at the tip of the flaps), but overall, I am very pleased.

***


The shirt I'm wearing in the photos is also one of my own creations, made from secondhand knit I found for 3 euros:


***


Let me know what you think about the video! All comments welcome! :D If there is anything that was unclear, don't hesitate to ask! :)

love,
Satu / Sew Scoundrel


Saturday, November 19, 2016

Long time no sew (dress to skirt quick fix)

Hey,
Well this fall has gone fast.

I've been struggling with health issues and my studies, so it's been a wild ride with no chance of proper rest.

I've done no sewing since September due to the various symptoms related to my MdDS... Well, it's getting closer to the end of November and I've been feeling better for the past week or so.

Yesterday I thought that it would be fun to do some sewing... for the first time in over a month!

So I sewed a zipper. :D

Yup. One zipper.

***


Some of you might remember the black and green dress that I made in August 2015.

Back then, I was asking for suggestions as to what symbol I should put on the front of the dress with fabric paint.

Well, I tried, but it didn't turn out the way I wanted it, and the dress bodice looked pretty awful. So I never followed up on that post, because I buried the botched dress in my closet and decided to forget about it.

I was cleaning my closet the other day, packing away summer clothes to put them in storage for winter, and I came across the dress.

For a moment I thought about just tossing the entire thing, but I still really liked the skirt half of the dress. Upon further inspection I realized I'd sewn the waistband folded in half, and then attached it to the bodice. Which in turn meant that I could just seam-rip the bodice off and the waistband would still be intact and wouldn't need to be replaced. Then I could just change the zipper to a shorter one and use it as a skirt!

So I did just that. I sewed the zipper in today, and now I have a full pleated black-and-green skirt.


Rip, rip, rip some seams and then add a zipper. Easy as that!


I feel like I'm going to get more use of this piece as a skirt, because now it can be paired off with different kinds of shirts and sweaters.

Lesson of the day: sometimes messed-up projects make great successes if you just let them sit in your closet long enough. :D

What do you think of this quick dress-to-skirt project?

love,
Satu / Sew Scoundrel


Sunday, September 4, 2016

A circle skirt that's also pleated (a kind of a tutorial)

Hello everyone,
So apparently my uni classes don't start until halfway through September. Well, more time for sewing! :D


The other day I went thrifting with Stormiina, and I was explaining to her that I have "fabric phases". Like about a year ago I bought any floral fabric I could find in thrift stores (and I haven't gotten through half of the florals I now have piled up at home). Then about six months ago it was all stripes and plaids and more geometric patterns and prints (and I haven't gotten through half of the geometric fabrics I now have piled up at home).

...Maybe I have a fabric hoarding problem? (My husband would wholeheartedly agree, but we're not asking him...)

Anyway, I was telling Stormiina that I'm now so over florals and stripes and plaids, and now it's all solid, one-color fabrics. Like, I need solid colors because I don't have much of those. No more florals for me, nuh-uh!

And then of course at the very same moment I dug this fabric out of the thrift store's fabric bin and immediately but it in my shopping basket.


So much for being over floral patterns, huh.

I don't know what the print is, exactly, but it reminds of fall foliage, red-tinted leaves on the ground; of forest walks on crisp autumn days. It's so lovely! The fabric is this kind of heavy-feeling non-stretchy rayon that has a nice drape to it. The fabric width was only 85cm (~33 inches), which makes me think it may have been intended as a curtain. However, there was 4 meters of it, so plenty for a full skirt.

I wanted to make a circle skirt that's also pleated. I've made pleats in circle skirts before (like with my kimono sleeve bed-sheet dress), but this time I wanted more pleats, but still a circle skirt. I like pleated circle skirts over pleated-only skirts, because they have so much more volume at the hem, without adding too much bulk at the waist.

So how do you make a pleated circle skirt?

When you calculate the radius of your circle skirt pattern (helpful calculator here), you insert your actual waist measurement, so the waistline of the skirt fits your waist exactly. But if you, say, double or triple your waist measurement, you're left with a full circle skirt that can then be pleated to fit your waist. Of course you can also accomplish this by simply cutting out two or three full circle skirts and sewing them together, but my method uses less fabric because the hem of the skirt is still only one full circle, not two or three sewn together. (Also, yay for not having to hem like 20 meters of skirt?)

Since my fabric was so narrow in width, I had to play around a bit to be able to maximize the fullness of my skirt. I didn't have enough to make a full circle, but I did manage to cut out 5/6 of a full circle that had a waist that was double of my actual waist measurement. But with full-width fabric this task would have been a lot easier.

I'm going to go through how I made this skirt, but this isn't exactly a tutorial or a full set of instructions, because I'm not giving out any exact measurements or telling you what you need to do step-by-step. But I am going to explain in detail how I made the skirt, so maybe this is helpful if you want to make your own pleated circle skirt. And really, if you've ever made a circle skirt, this is easy! Just cut out your circle skirt with a waist measurement that's way too big and pleat it to fit. But anyway, here's how I did mine:

I started out by cutting a strip off the end of the fabric. This would be my waistband, and it was about 12cm wide (~4.5 inches).


Next, I cut out five identical pieces that make a 5/6 full circle skirt. I had a pattern piece ready that is 1/3 of a full circle, I simply folded it in half and cut five (because I only had enough fabric for five pieces).


I made mine about 65cm long (25.5 inches) because I am a giant and for me that's just about knee-length :D (By Hand London's circle skirt app claims that 61cm or 24 inches is a "midi" skirt, so apparently their length measurements only cater to hobbits.)

Using the leftover scraps I cut out 4 pocket pieces, because all dresses and skirts need to have pockets.

I sewed two pocket pieces right sides together onto one of the five skirt pieces.


I took two more of the five skirt pieces and attached the other pocket pieces.


After sewing the pocket pieces on I ironed the seams flat and then serged around the pockets and all the sides of the five skirt pieces to prevent them from fraying. I then attached the skirt pieces at the side seams with a straight stitch. First the center front to the sides, sewing around the pockets:


Then the two remaining skirt pieces to the side pieces, leaving the back seam open:


I ironed the seams open after every step. So, after sewing the side seams I had a massive circle skirt that would have fit around my waist twice. I then turned my attention to the waistband.

I ironed some interfacing onto the backside of the waistband to help it keep its shape and look nice and crisp.

I ironed the raw edges in about 1cm (~0.4 inches) on both long sides of the waistband. I then folded the waistband in half lengthwise, but so that one side is slightly narrower than the other, so it's not folded exactly in half but a tiny bit off.


I also folded the ends in so the waistband fit my waist but had some extra (for overlapping the waistband above the zipper that would be sewn in the back seam).

Starting from the middle, I then started pleating the skirt waist to fit the waistband.


When pleating, I made sure that the pockets were at the very "bottom" of the pleat, otherwise the pockets would look weird and might make the fabric warp funny in the end. So the seams with pockets in them were in the innermost fold of a pleat.


Now, I didn't calculate or measure my pleats in any way, I just eyeballed them and ended up undoing them a couple of times to get them look nice as well as fit my waist.


Once the pleats looked okay and the skirt fit my waist, I sewed across the pleats with a straight stitch to keep them in place.


I took my waistband and opened it, then laid the narrower side of the waistband right side down onto the wrong side of the skirt, raw edges meeting. I pinned it in place, making sure the fold of the waistband (1cm from the top edge) was below the previous seam that was holding the pleats together. I then sewed straight along the fold, going slow and making sure the pleats stayed where they were supposed to.


So, narrower half of the waistband, right side onto the wrong side of the skirt, raw edges meeting and so that the topmost fold is below the previous line of stitches.

Once that was done, I folded and ironed the waistband open on the wrong side of the fabric. So this is what the inside of the skirt then looked:


Next, I folded the waistband over to the right side of the skirt and top-stitched it down close to the edge of the waistband.


This hides all the raw edges of the pleats inside the waistband, and since the piece of the waistband that's folded over to the front is a tiny bit wider than the other half, it also hides all the previous seams and stitches. So you're only left with a neat top-stitched waistband!


This is what the waistband looks on the inside:


Next, I added a zipper and closed up the back seam.


On the overlapping part of the waistband, I added two pieces of narrow elastic in between the waistband halves and top-stitched over the gap.


I marked on the other end of the waistband where the buttons should go to make the elastic closures functional, and hand-sewed the buttons on.


I hung the skirt overnight, then hemmed it. You're supposed to hang circle skirts for about a day so if the fabric warps on the bias you can then even it out and only then hem the skirt. It will prevent the skirt hem from going uneven later on. Some say the skirt should hang at least 24 hours, some say you should leave it for a week (!!!) before hemming it. However, I am impatient, so a week is not an option :D

...Well, my 24 hours wasn't quite 24 hours, either. It was more like 14 hours. After this I measured the hem from the waistband down and cut it even (it was a bit crooked probably because I wasn't too nitpicky about the pleats being exactly even at the top, not so much due to the hanging process).


Because of the hem-trimming, I didn't want to lose any more length to the hemming process, so I decided I was going to hem the skirt with bias tape - that way I'd only lose something like 0.5cm (~1/5 inch) and still get a nice, wide hem.

Unfortunately, I didn't have bias tape, or at least not in a color that would fit the colors of the skirt. So I had to make my own. I used a scrap piece of light gray fabric I had in my scrap fabric pile.


If you want to make your own bias tape, here is a set of instructions for that. I don't own a "bias tape maker", so I just ironed the folds by hand, eyeballing it as I went and it turned out just fine.

I opened up one of the folds and pinned the bias tape onto the right side of the skirt, raw edges matching.


I sewed the bias tape on the hem along the fold line, starting about 2cm (or 1 inch) from the beginning of the bias tape. When I'd sewn around the hem and got back to the point where I started, I sewed the bias tape ends together so there wouldn't be any raw edges anywhere on the bias tape, cut the excess and then finished sewing along the folded line.


Then I turned the bias tape onto the wrong wide of the skirt, ironed and pinned it. Since the other edge of the bias tape was already folded in, this left a nice clean strip of bias tape onto the wrong side of the hem that I could then just top-stitch down near the edge of the bias tape.


The hem then looked like this on the inside of the skirt:


...and like this on the outside:


I ironed the skirt and it was all done!


Here's how it looks worn (the first picture is without any underskirts and the rest are with a tulle petticoat).


Pockets!


***


I've been making so many stretchy pieces of clothing lately that it was nice to work on a non-stretchy project for a change. I really love how this skirt turned out!

So, what do you think of the skirt and the not-quite-tutorial? I hope it is of some help to you, and if you have any questions or comments, don't hesitate to leave me a comment below!

You can also comment/message me on Instagram: @somescoundrel

love,
Satu / Sew Scoundrel