Thursday, January 12, 2017

Diamond sweater dress (video tutorial)

Hey all,
One last post before I really need to get back to my studies! :D


I made a sweater dress with a diamond shape on the front, and I was blown away by the response on Facebook. So I made a tutorial:


Hope you like it, and if there's anything that's unclear or you want to ask, don't hesitate to leave a comment!

Love,
Satu / Sew Scoundrel


Tuesday, January 10, 2017

Waist length jacket from two recycled coats


Alright, alright. One last project, and then I'll have to return to my studies full-time. This procrastination has been fun while it lasted, but unfortunately responsibilities call...

So, I was cleaning my fabric/refashion stashes and I found two winter coats that I'd stashed away for further use.


One was gray and I got it for free from a recycling center. It had some holes in it and the fake fur collar was not my style, but I liked the gray wool fabric. The black one is one of my husband's old coats he wanted to throw away - the lining was all torn and one of the front pockets had a tear down one side as well. Also there was a stain on the shoulder that didn't come off even though I washed the coat (it said dry-cleaning only, but I figured if it didn't survive the wash I could just toss it, but it did - with the stain still on).

So neither of these coats was wearable as-is. So I decided to combine them into a waist-length jacket.

I made a raglan sleeve jacket pattern and cut out the pieces. The sleeves were cut out of the black coat and had to be cut in several pieces due to fabric restrictions. The rest of the pieces I got from the gray coat, and I don't think there was a single scrap piece bigger than 5 by 5 centimeters (2 by 2 inches) left by the time I was done. :D If there ever was a game of Tetris played with pattern pieces on fabric, this was it.


As a lining, I used a slippery red fabric with embroidered flower designs on it. The lining fabric was bought secondhand quite some time ago, and I hadn't figured out any use for it, but it was perfect for this project. The gray coat that I'd disassembled also had a layer of wool lining between the actual lining fabric and the outer shell of the coat, so I used that for the front and back pieces to make the jacket warmer.


I made welt pockets in the front pieces, because I could not make a jacket without pockets.


Lining done:


Lining attached to the outer shell:


I sewed the waistband on right sides together on the outside, then folded it on the inside and hand-stitched the waistband to the inside of the jacket.


I attached the sleeve cuffs (gathered by hand, cuffs inserted, and the lining sewn on the inside of the cuff by hand). Then I painstakingly sewed five buttonholes by hand and added five buttons on the other side.

And done:


And here's how it looks worn:


***


So, now I'll have to tone down the sewing for a bit, because I really need to continue working on my Master's thesis. Be sure to follow me on instagram if you don't already, because I post there more frequently and there are pictures of projects that never make it to the blog. You can find me here:
@somescoundrel

Anyway, what do you think of the jacket? :)

love,
Satu / Sew Scoundrel


Saturday, January 7, 2017

Refashion: an awful tent-sized cardigan to a warm winter dress

Hey everyone,
So I've been on a crazy sewing spree during the last week or so. I still have a few days of procrastination freedom before I need to get back to working on my MA thesis, but I've been putting that procrastination time to a good use.


It's been crazy cold here in Finland during the last few days, so I made myself a warm sweater from the fabric I bought from Mood Fabrics when we visited New York City in May. I didn't even remember I had that one, but it was lucky I did because it's so soft and warm - perfect for winter weather!

Well, why stop there? I remembered I had bought this absolutely hideous sweater/cardigan from a thrift store like two years ago, and I had never worn it.


But why buy a sweater that looks like that?

For this reason:


1) Made in Europe (Austria)
2) 100% wool
3) Price tag: 5 euros

And since there was so much of the sweater, I'd bought it with just the material in mind. The wool knit is very thick and warm and it has a nice stretch. Also, wool knit fabric tends to be expensive, so had I bought this kind of wool from a fabric store, it would have cost me a lot more than this raggedy cardigan.

***


I stood staring at the monstrosity covering about half of our king-sized bed for about two hours.

***


Then I got to work.

I ripped the pockets off. They left an indentation and some dust behind (picture on the left), but luckily a lint roller and steaming the area with an iron resolved the issue, and afterwards you couldn't tell where the pockets had been unless you looked very closely (on the right).


I also removed the green collar.


I pinned and sewed the front starting from below the buttons.


Once I had sewn the front shut, I decided that the original front with the buttons would become the back. I then lowered the neckline at the new front side and hemmed it. After that I did some measuring and then took in the sides. I decided to leave the sleeves wide at the wrists.


I ripped open the original hem, as the dress wasn't long enough.


It still wasn't long enough, so I took the strips I cut off the sides and made them into a long band which I then attached to the hem.


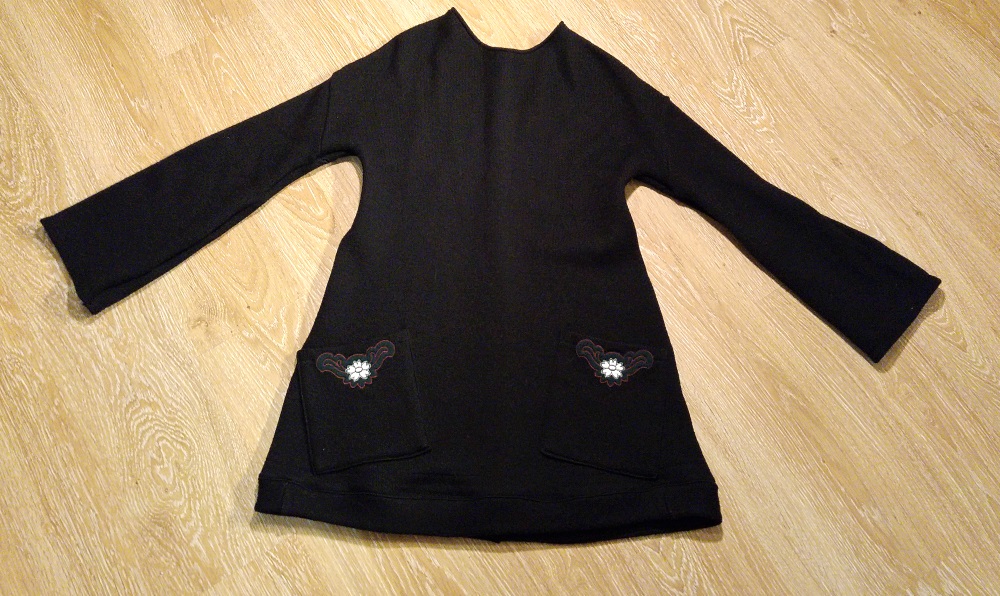
I liked the pockets, so lastly I decided the pocket placement and sewed the pockets back on.


And done!

From a tent to something quite wearable:


So nice and warm. ♥


***


So, what do you think of this refashion? :)

Love,
Satu / Sew Scoundrel


Tuesday, January 3, 2017

Video tutorial: circle skirt with geometric pockets

Hey everyone,
And Happy New Year!

Last fall I made my first video tutorial, how to sew a cape with pockets. As I discovered then, making videos is really time-consuming, and I didn't have a chance to make another video until now.

This time, I had scored about 3 meters (~3.2 yards) of light brown tweed fabric at a thrift store for 2 euros.

I decided to make it a vintage-inspired skirt with some fun pockets.


The pockets are inspired by this Pinterest pin about a 50's dress with fun pocket design. Sooooo to prepare for this project, I made pocket mock-ups... in my head, because making mock-ups with scrap fabric is for suckers--
Nah, just kidding. It would be wise to make mock-ups, but since I am lazy, I just planned it all in my head. And sometimes it works surprisingly well! :D

So, this not-planned, not-tested-out pocket design is now here for your pleasure in video form!

***


***


All in all, I think this project went surprisingly well, considering I mostly just winged it. The tips of the pockets aren't as sharp as I'd hoped (a problem I could have avoided by making the seam allowances wider at the tip of the flaps), but overall, I am very pleased.

***


The shirt I'm wearing in the photos is also one of my own creations, made from secondhand knit I found for 3 euros:


***


Let me know what you think about the video! All comments welcome! :D If there is anything that was unclear, don't hesitate to ask! :)

love,
Satu / Sew Scoundrel