Hello everyone,
this is part 2 of my Making of my Big Sister cosplay. For part 1, click here.
(Click on images for a bigger version.)
So in the last post I'd just spray painted the helmet silver. After the spray paint dried, I started weathering the helmet to make it look worn and old and, well, not so shiny.
I used the technique from this video. I used some acrylic paints and some of my husband's old miniature paints. I mixed up black and brown, added some water, painted a small area making sure I got the paint in all the creases and then dabbed the excess off with a damp cotton ball. I did this to the entire helmet and the still unglued window frames. (The window frames were spray painted with copper and gold prior to the weathering process.)
Meanwhile I was also building up the oxygen tank and the adjoined Little Sister basket. The oxygen tank was made with some wire netting and a piece of a sleeping pad, plus some craft foam, a styrofoam ring, bottom of a yogurt container, another serger thread cone, a soda cap etc.
The top of the tank is actually a lid. It comes off so I could still work on attaching the Little Sister basket onto the tank later, and figure out how the tank would be attached to me eventually.
I then made the basket, using strips of craft foam and a single "row" of wire netting. I placed the wire netting in between two strips and glued everything together with hot glue so the netting was completely hidden between the two layers of craft foam.
When I had six long strips, I assembled the basket by folding the strips around one another and hot gluing the entire thing together. At some points I also used steel wire to reinforce the basket, and then glued more craft foam on top of the wire to hide it.
The ends were attached to a sturdy piece of cardboard and some sleeping pad pieces with actual bolts-and-nuts. Washers were placed at both ends to prevent the bolts from slipping through the wire netting.
The basket was spray painted with copper and later on weathered. The tank was spray painted black, dry brushed with dark blue and the top was painted red and then weathered. The tank rings were dry brushed with dull metallic color.
After the paint dried, the basket could be attached. This is how it then looked:
After weathering the entire helmet, I added lights. I bought a set of battery-powered LED lights for 10 euros. I made a pouch for the battery pack from pieces of sleeping pad and glued the pouch to the back of the inside of the helmet.
Next I glued the lights in place around the windows using pieces of craft foam. When I was happy with the placement of the lights, I glued the window frames on, with the red office divider inside the frames as "glass". It was starting to look like a Big Sister helmet!
I started working on the chest plate next.
The base is two identical pieces of sleeping pad, glued together with wire netting sandwiched in between for support so the piece keeps its shape. The piece is longer at the back so the tank can be attached later.
A "collar" that matches the sleeping pad ring on the helmet was added to the chest plate. I also added some corset lacing string on the back and the front so the chest plate could be anchored around my torso. (The front strings can be seen hanging below the chest plate in the next photo.)
I needed to cut the chest plate narrower at the shoulders, so then I had to cover the edges with craft foam to hide any poking pieces of wire. I also added some rivets (bottle caps) on the chest plate. The actual edges of the chest and back were cut separately from craft foam and painted copper, whereas the plate itself would be silver.
The red arrow in the mirror selfie points at a hole I cut in the collar, and it's housing a bluetooth speaker! So I could play actual Big Sister sounds (more like screeches) from my phone via the speaker. I made a craft foam ring around the hole I cut to hide the raw edges.
Next up, shoulder plates!
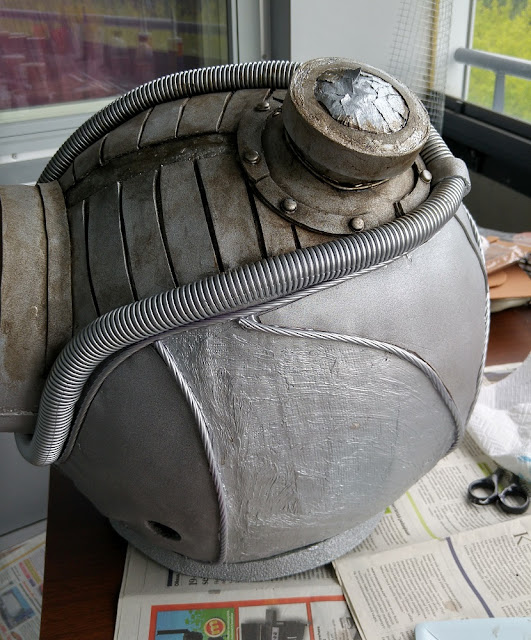
I used this blog post as my guide. Following the blogger's example, I used a styrofoam hemisphere as a base for the bigger shoulder piece, topped it with pieces of sleeping pad and decorated the shoulder plates with craft foam and some random caps and things as rivets.
The chest plate and shoulder pieces were spray painted silver and the copper edges glued to the chest plate.
The shoulder plates attached to the chest plate with zip ties to allow for some movement. Everything was weathered using the same technique as with the helmet.
At this point I realized that if my armor was going to be all worn and weathered, I couldn't don crisp clean white (or even ivory/cream) clothes underneath. At this point it was two days til Ropecon, and I didn't have much time left, and lots to do still.
So I quickly made a huge pot of black tea (using like 40 teabags), let it steep for 20 minutes. Then I fished the teabags out and left the clothes to soak for about two hours.
After I took them out of the tea bath, I rinsed the clothes in cold water with some vinegar and ta-dah, the clothes were a lovely shade of tattered yellow.
(They also smelled like tea. Which meant that when I started sweating in my costume, I also smelled like tea... XD)
At this point, I was in such a hurry that I didn't stop to take many pictures. I made the leg-warmer-guards (or whatever) using pretty much the same technique as with the waist corset. I made four of these altogether.
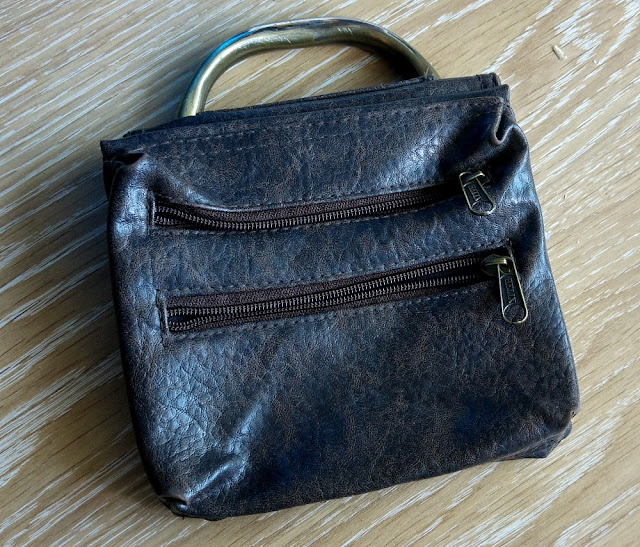
I was fast running out of the scraps from the secondhand leather coat, so I switched over to a brown fake leather backpack I'd thrifted earlier for 3 euros. From this, I salvaged the front pocket and the backpack handle, and made them into a kind of a "fanny pack" that was hanging from my hip with two ropes. The Big Sisters in some pictures are carrying something (that looks like an empty photo frame but I don't know what it actually is) on their hips, hanging there by a rope, but I decided I needed something to hold my phone, hotel key and some cash, so I made it into a fanny pack that matched the outfit.
I also cut off a suitable-looking piece and sewed it into a loop using two straps from the backpack: this was the arm brace for the arm with no weapon on it. The straps can be tightened and loosened to get the brace on and off. The fingerless gloves I was using with the outfit were recycled from an old steampunk outfit.
I just used a pair of boots I already owned for the cosplay. My shoes were actually black, but my husband splashed them with some brown spray paint to make them blend into the outfit a bit better.
My husband also made the arm stinger weapon. It was made with some styrofoam, a piece of a pipe that forks in y-shape, some old wires, another empty serger thread cone, reusable straws and an empty hair oil bottle. The hair oil bottle was filled with water that was dyed red with food coloring and it attached to the other fork of the pipe. The styrofoam plate attached to the pipe, and on top of that were actual old gate valve pieces my stepdad found in his father's garage.
I attached the leather backpack's closure mechanism and some straps etc on the arm stinger so it would go around my arm. I also dyed some water blue with food coloring. The water was inserted into the chocolate syringe I bought from New York, and it was attached to the arm brace with another two scraps from the backpack.
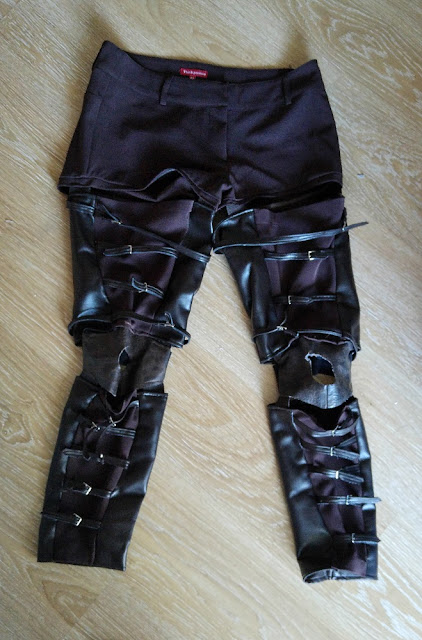
The pieces of the backpack were also used to make the knee pads, along with some wide elastic band at the back to make them stretchy. When I tried the outfit on, everything was all good, until I moved. Then the thigh guards and knee pads started sliding down in about three seconds.
So I took the remaining straps from the brown backpack and I sewed them along the inner and outer sides of the leg pieces, essentially making the shorts and leg pieces "pants". Some very, very weird looking strappy, buckled pants. :D
...Well, at least they stayed up this way.
Lastly I asked my husband to paint some fish on the tank, while I sewed some pink bows for the Little Sister basket.
The chest plate was strapped onto my torso at the front and the back with corset lacing strings going around my waist. The tank was then attached to the chest plate with three leather straps that went through the chest plate at the back, in and out of the tank a few wire netting holes apart and then buckled up between the chest plate and the tank. For added security the tank was also strapped around my waist beneath the corset using leather belts. Still the tank contraption was the most difficult thing, it swayed from side to side and needed to be fixed constantly. When I wear this next time I need to figure out a more secure fastening for the tank and the basket.
So here's the final result:
We also met this hilarious guy who was dressed up as Deadpool in a bathrobe ("Edpool"). He took several pictures with me and my husband (dressed up as Warhammer 40k Imperial Missionary, with a gun hanging from his back), but at the time this guy didn't know who we were dressed up as... so this hilarity ensued on his blog:
"Go-Go Death Star Head."
"Machine-gun Jesus."
Best. Thing. Ever. :'D
Walking around in the costume was entirely possible, if a bit difficult. I could see out of the main window, meaning I could see straight ahead, but not my feet or the floor ahead. My sides were completely blind and I couldn't hear properly. So mostly what we did was that my husband with his book-on-a-stick (patent pending) walked ahead of me and I simply followed the book, hoping I wouldn't crush any small children, hobbits or dwarfs underfoot, because I couldn't see anyone shorter than 4ft if they came up right next to me.
Not that I was walking long distances anyway... I was stopped fairly often for photos. People were snapping so many pictures of me, it was insane. I don't think I would have been able to stand all the attention with my own face visible, but this cosplay is perfect for hiding your face, so it was actually kind of fun! (I'm not shy or hate attention, it's just too much attention on me for too long makes me anxious.) People were telling me my cosplay was amazing, which naturally felt really good. And while most people taking photos probably didn't know the character I was cosplaying, quite a few did and came to talk to me about Bioshock. It was really cool and I loved talking to everyone and posing for photos.
I also participated in the annual costume competition at Ropecon, and after I'd already left on Sunday I was informed by phone that apparently I won first place on the "Individual" category. I find myself unbelieving this is true until I receive my certificate in the mail, but a cautious "yay" might be in order? :D
(Update: I received confirmation in the mail! It's true! :o)
All in all, I'm very happy with how this came out. I've never built a cosplay of this scale, so I'm very pleased with how it turned out. Of course there are a few things I could have done differently and saved myself some time and trouble, but it's a learning process. I'll know better next time.
Total time it took to make this cosplay? I don't know the exact amount, but a 100+ hours.
Total cost: something like 250€. This included all the materials bought for this project - but not all of it was used, so there's some left over for the next craft project (like craft foam, wire netting, hot glue gun and glue sticks etc). But this is definitely not the cheapest cosplay to make. Ordering stuff online would probably have saved me quite a lot of money - well, like I said, had I gotten this idea earlier... I personally think it was well worth the money. I mean, cosplay is a hobby. Hobbies sometimes cost money. I don't have other hobbies that cost this much, so I can afford this once-in-a-lifetime project. (No, I don't think I'll be making another cosplay of this scale of complexity anytime soon.)
Well, if you're still with me after all this rambling and billions of photos, thank you very much for reading! If you have any questions or thoughts, feel free to leave a comment!
Satu / Sew Scoundrel


Hey, I just wanted to say that your cosplay was brilliant and a very well-earned first prize. And I really appreciate this set of posts detailing your process.
ReplyDelete2017 is going to be a big year for us cosplayers, I'm planning something a little more ambitious than "Edpool" myself next time around, so this was definitely a great set of info.
I was mainly curious about craft foam. What sort of quantities can you get and where do you get it? I found it at Sinelli for like €10 for a dozen A5 sheets, and that's ... not practical :-D I saw from your Part 1 post that "Altogether this project swallowed up something like 25 pieces of A4 sized craft foam sheets (one sheet cost 90 cents, so ~22 euros)," so maybe there isn't another format to buy it?
Maybe it's a good idea for me to drop my original idea of making armour plating out of it, then, and just use it as you have. Armour will have to be some other foam or cardboard/plaster/plastic combo...hmm.
Anyway, thanks again and any tips you can offer would be appreciated!
My own "Edpool" costume is sort of a go-to for me, this is the third time Edpool has appeared at Ropecon. This year I added the bathrobe because he was meant to be a Jedi (order and chaos). A lazy cosplay, but always fun.
Edpool also has a YouTube channel, if you'll pardon the plug:
https://www.youtube.com/watch?v=-o6VxoWBnQk
Yeah, craft foam is kind of hard to come by in Finland... apparently in other countries like the US they sell it by bigger sheets (and it's cheaper, because f**k you Finland for being so expensive for a crafter). I found mine at Sinooperi (Turku/Raisio), Presento (Turku) and Muovitukku (Turku). They all sold it by A4 sheets and the price was 90 cents per sheet at cheapest (Presento & Muovitukku; Sinooperi charged something like 1,20€ per A4). Muovitukku sold 10xA4 packages for 8,90€. But since you have more time seeing as you're aiming for this to be made by next summer, I'd suggest diving into Ebay because you might be able to find bigger sheets at a cheaper price there. Search for "craft foam", "foam sheets" etc. I quickly searched "craft foam" and it's sold by rolls as well as sheets on Ebay.
DeleteBut! If you're looking to make armor plating, I'd suggest EVA foam. I couldn't find it anywhere or I would have used it. It's thicker than craft foam and most other Big Sister cosplayers I found had used it. I think you can find it at Biltema or Motonet here in Finland (alas I didn't know this at the time I was making my costume). But definitely try EVA foam for armor plating and craft foam more for decorative purposes. :)
Fantastic, this is already a great help. EVA foam, Biltema / Motonet, check. I'll check prices there and then see if Ebay sells it cheaper.
DeletePlenty of time ... but then, I tend to say "plenty of time" right up until there's 2 weeks to go, and then I say "fuck it, Edpool in a bathrobe it is..."
This looks like an option on Amazon: https://www.amazon.com/Craft-Foam-Graphite-Dampening-Sculpting/dp/B01AY91LEK/
DeleteBut should probably shop around more.
Sorry to turn this into a brainstorming session but hopefully this will also be useful to others.
Don't worry about it, as far as I'm concerned this is the best place for brainstorming when it comes to cosplay! :D You could also search youtube for people working on EVA foam, there are great tutorials there :)
DeleteAivan huikea cossi, olisinpa ollut näkemässä! <3 Oli ensimmäinen kerta moneen moneen vuoteen kun en päässyt Ropeconiin...
ReplyDeleteKiitos! No, ehkä vielä puen tuon uudestaankin johonkin coniin niin pääset näkemään livenä (tulee hintaa hiukan liikaa per käyttökerta jos se oli vaan kertakäyttöinen asu :D)
DeleteTää on kyl huikea. Yhtään en tiedä hahmosta mitään, mutta lopputulos on tosi hyvännäköinen. Etenkin vanhennukset/kulutukset varusteissa! *peukku*
ReplyDeleteKiitos! ^_^
DeleteIt's jaw droppingly awesome!!!
ReplyDeleteAww, thank you so much! :)
Delete=O! Yay to see another Big Sister Cosplay, I am reworking my own costume right now and found this while looking up character sheets. What you have done is super great and I love to look of yours ^,^
ReplyDeleteThanks so much! ^_^
Delete