Saturday, August 16, 2014

DIY: Circle skirt (because a woman can never have too many circle skirts.)

I am a big fan of circle skirts. And they're so easy to make! I was a bit hesitant before I tried to make one a few months back, but I found this tutorial and it made it look so easy.
And it really is easy. Once you've made one, you can make a dozen a day, seriously. I have all kinds of circle skirts, but I didn't have a regular black one... so, off to the fabric store I went!

I rummaged through the scrap fabric bins again (fabric bought by the yard is so damn expensive here). I found these pieces of black and gray fabric and snatched a few 25cm zippers as well. The topmost fabric was a bit expensive, but I liked it so I had to buy it as well. It's this thick glossy black. I'm going to make a more formal skirt out of that one... but first, I decided to make a flowy gray circle skirt.

I have made a pattern of a circle skirt that is 70cm long (a bit below my knee because I am a friggin' giant). This is half the skirt, so you can either cut two pieces or then just fold one piece of fabric where the picture shows. This time I wanted one that falls above my knee, so I only used the pattern for the waistline...

To calculate the radius of the half circle that forms the waistline, measure your waist at the part where you want the skirt to sit. For me this was 70cm. To calculate the radius, divide your waist measurement with 2π. So for me it would be
70/2π
=70/6.28
=11,14. My old pattern has a rounded up waist radius of 12cm, I just used that because I wanted to bunch up the waistline a bit.

If you don't have a pattern, you can just measure the radius from the center of the fold, as I've done with the pins here. Then just cut right outside the pins (dotted line).

Here I wanted to find out how long a skirt this piece of fabric would allow, so I put the end of the measuring tape on the waistline...

...and measured it down to the end of the fabric. 62cm.

So then I measured 62cm in every direction from the waistline, pinning as I went along. This forms the hem of the skirt.

I cut the waistline...

...and then cut the hem along the pinned line I'd just measured. This is what the skirt looks when cut.

Next, I made the waistband. It should measure a good 5cm more than the waistline of your skirt. The width can be whatever you like. I wanted a narrower waistband, so mine was something around 12cm, so the end result would be around 5 centimeters with the seam allowance.

I pinned the waistband lengthwise (right side against right side if your fabric has a pattern or something) and sewed it. I then pulled the long, narrow tube of fabric inside out, so that the nice seam is on the outside.

I pinned the waistband onto my skirt, right side against right side (it looks like you're pinning it upside down but that's the right way to go). I bunched up the skirt fabric in a few places, but that's optional. I then sewed along the pinned line...

...and got this. On the left you can see where the waistband ends. At that part I cut a slit for the zipper.

I pinned the zipper, deciding to go for a contrast color.

I then sewed the zipper on so the zip was open until I got to the very end. Then I zipped up the zipper and sewed down the rest of the way.

Look, it has a zipper! A red zipper, for that matter.

Next up, pinning the hem. Hemming a circle skirt is a bitch, because the hem is, well, a circle shape, so it will not fold nicely. Also, there will be meters and meters of hemline to fold and pin. I made a narrow hem seam, folding the fabric over twice for a nice hem.

I then sewed the hem, choosing a red thread to go with the zipper.

So the skirt was now more or less done. But the skirt looked rather dull on its own, so I wanted to make pockets. I usually add pockets to the side seams of a skirt, but with this circle skirt there are none. So I rummaged through my stash, in search of something red.

I took out a linen shirt I have stashed in my refashion pile and cut off one of the sleeves at the dotted line. I then ripped open the side seam and cut the fabric in two, forming two rectangles with the sleeve's original hem as the top of the pocket. I folded the sides and the bottom of the pocket squares and ironed them (I love how well linen behaves when ironed... it makes such nice, sharp folds). I then pinned the pockets over the sides of the skirt. I decided they looked better slightly angled. I sewed them on...

...and the skirt then looked like this. Not dull any more, no sir.

Here's the back with the red zipper.

Closeup of the hem. I had to iron the hem to get it to settle nicely.

This is what the skirt looks like on me. The length is perfect and I love it how flowy the fabric is.

Pockets!


And the cost of this skirt?
Around 4 euros, zipper and thread included. Nice.

Next, I'll probably make a simple black circle skirt for the winter. :)

love,
soundrel

Thursday, August 14, 2014

Last days of summer

Today we went to my husband's family's summer cottage which is on a small-ish island very near the coast. My husband was there to work on his lumberjack skills (they chopped wood most of the time with his dad). Meanwhile, I was left to my own devices to I did a bit of exploring and photographing (with my phone).

Such a peaceful view.


I found some lingonberries. Alas, they were still raw (I tried one).


Rowanberries.


I found this ladybug resting on a pinecone.


Tiny little flower.


Raindrops on roses pine needles.


I did some reading...


...and some standing around...


...and some ridiculous jumping. :P


Anyways... it was a fun day. And the book I started reading, The Snow Child by Eowyn Ivey, seems rather interesting.

Bye-bye, ladybug.


love,
scoundrel


Monday, August 11, 2014

Jackson Pollock inspired DIY

A while ago I was googling something related to sewing dresses, so I was messing around on Google Images when I came across this picture:

Picture from here.


So I found this awesome tutorial about painting a dress, Pollock style.

Some actual Pollock for reference.
Picture from here.


I had this light blue skirt that I purchased a while back from Goodwill. I had previously taken it in about an inch so it would sit nicely on my waist, but as I generally shy away from light colors, it still felt a bit dull. So it was the perfect target to try the Pollock inspired DIY on.

I bought some black textile paint from a craft store, took a few different sizes of paint brushes and got to it. By the end of the process, I had black paint up to my elbows and also some random splashes below my knees, and the skirt hem started to look like this:


I let the paint dry overnight and then ironed it to set the paint (as instructed on the container).

Ta-dah!


I'm so happy with how the skirt turned out. And painting it was so much fun, too! I got to splash around like a kid fingerpainting. :D And now the skirt doesn't look dull anymore, so I'm guessing I'll be wearing it a lot more from now on. Hooray for DIYs!

Rocking the new look.


love, scoundrel

Wednesday, August 6, 2014

A quick DIY refashion: getting rid of BLING.

Today, I found in my closet a skirt I had bought from the local Goodwill store a while ago. I tried it on and it fit okay.


Now, there isn't very much wrong with the skirt, as you can see. It's rather nice as it is, print and all, aside from one tiny little detail...

Sequins.


Yes, sequins. Rows of silver sequins sewn all along the hem and down between the rope prints. I don't particularly like sequins. But since the silver is rather dull and not sparkly, I was ready to let it be and just wear the skirt as it was. So I put the skirt on, and--

I have to ask, have you ever tried sitting on a pile of sequins? Because I personally did not like the feeling of sequins digging into my ass when I sat down.

So off they came.


Bye-bye, sequins!


Seriously, why would anyone put sequins on that skirt? It looks a lot nicer without them.


The difference is subtle when you look at the pictures, but in real life it really makes quite a difference. Plus, you know, sitting down is not a literal pain in the ass anymore.

Rocking my new, sequin-free skirt.


So, this has turned into quite a sewing/clothing related blog. Meh, whatever. :P

love, scoundrel

Thursday, July 17, 2014

DIY infinity scarf

I found a scrap piece of colorful, see-through fabric at a fabric store sale bin. It was probably a piece of some sheer curtain or dress fabric. It was 1.5m long but there was only a narrow width of it. However, I loved the colors so I bought it anyway.


The color turns from black to blue to green to yellow - such lovely, summery hues.

I decided to make a light summer scarf.

First I pinned the fabric lengthwise, right sides together.


Then I sewed the long sides together, and turned the long tube of fabric the right way around again.


Then I pushed the yellow end inside the black end of the tube and turned the raw edges of the black fabric in. I sewed over the hemmed edge, simultaenously attaching the ends together. Like so:


Now I have a feather-light infinity scarf for summer use:


love, scoundrel

Tuesday, July 15, 2014

That's SEW awesome (pun intended), a.k.a. the "I have no idea what I'm doing DIYs"

This spring, my mother gave me her old sewing machine. The damn thing weighs around 20 kilos (~44 lbs) and clocks in a sweet career of over 50 years. Seriously, it still has the original manual with the date of purchase written in it - which was in 1963. This machine is an Iron Lady if there ever was one, and still runs (or sews) like a dream.

Sweet ol' Miss Bernina in her shades of olive.


At first Miss Bernina sat in her box for a few months, but then I ordered a dress online and wasn't very fond of the neckline. So I decided to try and alter it myself, rather than either let the dress sit in my closet or pay someone else to do it. It took me a couple of tries and a lot of browsing that old manual, but eventually I figured out how to get things done. My first DIY refashioning was a modest one - deepening a strangling boatneck into a v-neck.

This is what I started from...

...and this is where I ended up.


After that, it was a small step to broaden my horizons and put my nonexistent sewing skills to the test. This needs perhaps a little bit of explaining. See, Ropecon (a role playing convention) was fast approaching, and I didn't have a costume. So I decided to make one myself! Can't be that difficult, right?

Note that the last time I'd even looked at a sewing machine or clothing patterns was somewhere around the age of fourteen, so another fourteen years had passed without me doing any sewing, except for some minor sewing by hand.

I knew I wanted to do something Doctor Who related, because of course I did. I also wanted it to be somewhat comfy and easy to be in, because after every single Ropecon I've sworn an oath to not to wear a costume that requires a corset next year... and lo and behold, next year I'd be there in a corset, very uncomfortable once again. Well, not this time!

Can you guess where I'm going with this one?


...yeah, that's right.


I googled "TARDIS dress" and I came across this wonderful plan for a dress. I then sketched my own plan on a piece of paper, and I used two existing dresses to make patterns for it. Out came that blue dress. It is by no means perfect. The zipper in the back is a bit loopy around my waist, and the side pockets are rather low on the side seam. But well, considering that this was essentially the first thing I'd sewn from scratch in 14 years, it isn't that bad. Now all it needed was the black and white decorations to make it a TARDIS dress instead of just a blue dress.

Ta-dah!


I gave myself some serious patting on the back after I finished this dress. It's pretty much as perfect as I could have ever imagined. For something I made myself, of course. And it doesn't require a corset! HUGE-ASS BONUS RIGHT THERE.

***


So next, I decided to make another costume, because why the hell not?

This costume is not done yet, except for the clothes. There is still a liquid latex head coming along, but that's not finished. But seriously, check out what I managed to do as the second DIY sewing project after 14 years:


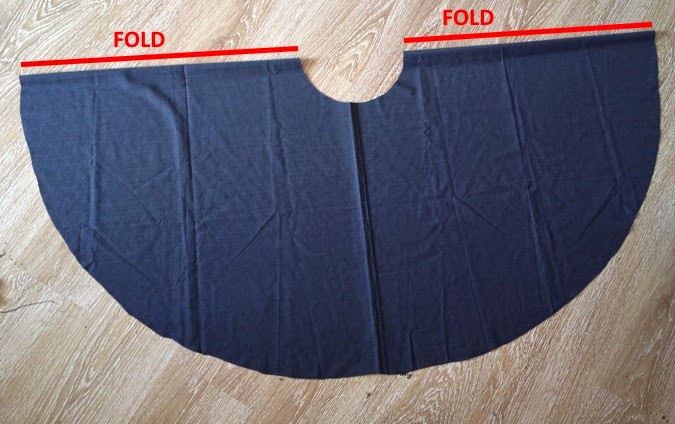
It's actually a two-piece dress. The skirt is a 3/4 circle skirt, with a zipper in the back. Hemming that skirt was a bitch, I can tell... because it's almost a full circle, the hemline is something like 6.5 meters (~22 ft) long...

The jacket part started off with this in mind:

Photo courtesy of BurdaStyle.


After excessive measuring of my own body parts and jackets that I own, my own plan looked like this:


So I set out to draw my own pattern using those measures. It was a little bit of a trial and error, but it turned out okay. The jacket doesn't have a lining and the seams don't really stand careful scrutiny, but it looks okay and that's the most important thing for me right now.

The hooded cape I made using this tutorial I found with the help of Google.

So now I have not one, but two costumes for Ropecon (if I can finish the head of the latter one in time...) The TARDIS dress cost me about 10 euros (~$14) altogether, as I found the blue fabric in a sale bin at the fabric store. The longer dress and the cape were a bit more expensive, coming in at about 50 euros (~$70) together.

***


So, now I had established that I wasn't completely hopeless at sewing. So the last few days, I've found myself doing more and more DIY sewing projects. For example, a top I refashioned originally had long sleeves, but I ripped them off and gathered the shoulder parts with some bias tape and a cute button.

You can't really see what I did here, but it's a lot nicer now, I swear!


Another refashion I did for a shirt was to cut a hole in the back and hem the edges, like this:


I did a bunch of t-shirt modifications, and decided to visit the local Goodwill store to see if I could find something else to modify.

Instead, I found that the Goodwill also has huge bins of all kinds of scrap fabric. For a moment, I felt like a kid in a candy store. I found a decorative pillowcase and several pieces of scrap fabric in different colors.

Then I found two pieces of print fabric with a Japanese style print. Totally gorgeous. They were 1.5 m wide and 0.5 m long, and I contemplated if I could possibly make a skirt out of them.

Turns out I totally could:

This skirt cost me a whole 2 euros and 20 cents ($3), zipper included.


***


Then there was the pillowcase with a fun print. I decided to make a clutch purse, because I'd seen a tutorial and wanted to try it. I also added a pocket on the inside, using this Youtube video. The total cost of this purse was around 3 euros ($4), zippers and all included.

A fun print for the front of the purse...

...and a graphic red-and-black for the back.
(By the way, the black fabric here is a scrap I had left over from the hooded cape. So the cape also has this subtle pattern on it.)

Longer zipper for the clutch purse itself, the shorter one for the pocket. Gray fabric is for the pocket.

Here I've sewn the zipper and you can see the pocket I've made.

All done and ready to use!


***


So yeah, you could say that I'm more than a little bit excited about sewing these days. It's so nice to have a hobby where you can see the end results forming as you go. And since I am on forced vacation (couldn't get a summer job), I might as well do something useful with my time. Yay for sewing!

love, scoundrel